Introduction to Gluten-Free Bliss Bars Recipe
What Are Gluten-Free Bliss Bars?
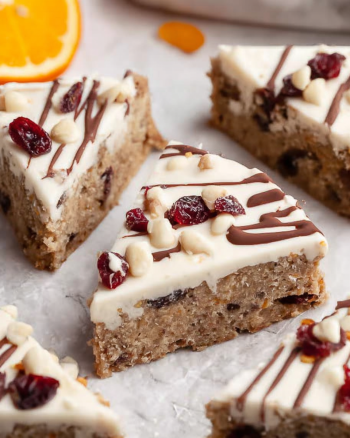
Gluten-Free Bliss Bars are delicious, chewy treats that everyone can enjoy. Made with wholesome ingredients, these bars are perfect for those who follow a gluten-free diet. They combine almond flour, rolled oats, and shredded coconut, creating a delightful texture. Plus, the addition of chocolate chips makes them a sweet indulgence. Whether you need a quick snack or a dessert, these bars are sure to satisfy your cravings!
Why Choose Gluten-Free Bliss Bars?
Choosing Gluten-Free Bliss Bars is a great option for many reasons. First, they are made without gluten, making them safe for individuals with celiac disease or gluten sensitivity. Second, these bars are packed with nutrients. Almond flour and oats provide healthy fats and fiber, while the chocolate chips add a touch of sweetness. Additionally, they are easy to make and can be customized to fit your taste preferences. Whether you want to add nuts, seeds, or spices, the possibilities are endless!
Moreover, these bars are a fantastic alternative to store-bought snacks, which often contain preservatives and artificial ingredients. By making them at home, you control what goes into your food. This not only ensures a healthier option but also allows you to enjoy the baking process. So, gather your ingredients and get ready to whip up a batch of these delightful Gluten-Free Bliss Bars!
Ingredients for Gluten-Free Bliss Bars Recipe
To create your own batch of Gluten-Free Bliss Bars, you’ll need a few simple ingredients. Each component plays a vital role in achieving the perfect texture and flavor. Here’s what you’ll need:
- 1 cup almond flour: This gluten-free flour adds a nutty flavor and a moist texture.
- 1 cup rolled oats: Oats provide fiber and help bind the bars together.
- 1/2 cup brown sugar: This sweetener gives the bars a rich, caramel-like taste.
- 1/2 cup unsweetened shredded coconut: Coconut adds a chewy texture and tropical flavor.
- 1/2 teaspoon baking soda: This leavening agent helps the bars rise slightly.
- 1/4 teaspoon salt: A pinch of salt enhances the overall flavor.
- 1/2 cup creamy almond butter: Almond butter provides healthy fats and a creamy consistency.
- 1/4 cup honey or maple syrup: This natural sweetener binds the ingredients and adds sweetness.
- 1 teaspoon vanilla extract: Vanilla adds a warm, inviting flavor to the bars.
- 1/2 cup chocolate chips: Use dairy-free chips if desired for a vegan option.
These ingredients come together to create a delightful treat that is not only gluten-free but also packed with flavor. Feel free to experiment with different add-ins or substitutions to make the recipe your own!
Step-by-Step Preparation of Gluten-Free Bliss Bars Recipe
Step 1: Gather Your Ingredients
Before you start baking, it’s essential to gather all your ingredients. This makes the process smoother and more enjoyable. Make sure you have everything on hand, including almond flour, rolled oats, brown sugar, shredded coconut, baking soda, salt, almond butter, honey or maple syrup, vanilla extract, and chocolate chips. Having your ingredients ready will help you stay organized and focused while preparing your Gluten-Free Bliss Bars.
Step 2: Prepare the Base
Now that you have your ingredients, it’s time to prepare the base. Start by preheating your oven to 350°F (175°C). Next, line an 8×8-inch baking pan with parchment paper. Leave some overhang on the sides. This will make it easier to lift the bars out once they are baked. In a large mixing bowl, combine the almond flour, rolled oats, brown sugar, shredded coconut, baking soda, and salt. Mix these dry ingredients well until they are evenly distributed.
Step 3: Mix the Filling
In a separate bowl, whisk together the creamy almond butter, honey or maple syrup, and vanilla extract. Make sure the mixture is smooth and well combined. This step is crucial as it adds moisture and flavor to your bars. Once mixed, pour the wet ingredients into the bowl with the dry ingredients. Stir everything together until fully combined. The mixture should be thick and sticky. Finally, fold in the chocolate chips, ensuring they are evenly distributed throughout the batter.
Step 4: Assemble the Bars
Now it’s time to assemble your Gluten-Free Bliss Bars! Spread the mixture evenly in the prepared baking pan. Use a spatula to press it down firmly. This helps the bars hold their shape while baking. Make sure the surface is smooth and even. If you like, you can sprinkle a few extra chocolate chips on top for a decorative touch.
Step 5: Bake the Bars
Place the baking pan in the preheated oven and bake for 20-25 minutes. Keep an eye on the edges; they should turn golden brown. The center may look slightly soft, but it will firm up as it cools. Once baked, remove the pan from the oven and let it cool for about 10 minutes. This cooling time is important for the bars to set properly.
Step 6: Cool and Cut the Bars
After the initial cooling period, use the parchment overhang to lift the bars out of the pan. Place them on a wire rack to cool completely. Once cooled, cut the bars into squares. You can store them in an airtight container for a delicious snack or dessert anytime. Enjoy your homemade Gluten-Free Bliss Bars!
Variations of Gluten-Free Bliss Bars Recipe
Nut-Free Options
If you or someone you know has a nut allergy, don’t worry! You can still enjoy these delicious bars. Simply substitute the almond flour with sunflower seed flour. This will keep the bars gluten-free and nut-free while maintaining a similar texture. Additionally, replace almond butter with sunflower seed butter. This way, you can savor the same delightful taste without any nut ingredients.
Vegan Adaptations
For those following a vegan lifestyle, making these Gluten-Free Bliss Bars is easy! Instead of honey, use maple syrup as your sweetener. This keeps the bars plant-based while still providing that sweet flavor. Ensure that your chocolate chips are dairy-free as well. With these simple swaps, you can enjoy a vegan version of these tasty treats without compromising on taste!
Flavor Variations
Feel free to get creative with flavors! You can add 1/2 teaspoon of cinnamon for a warm, spicy kick. If you love fruit, consider mixing in dried cranberries or raisins for a chewy texture. For a tropical twist, try adding chopped dried pineapple or mango. The possibilities are endless! Experimenting with different flavors can make each batch of Gluten-Free Bliss Bars unique and exciting.
Cooking Note for Gluten-Free Bliss Bars Recipe
When making Gluten-Free Bliss Bars, it’s important to keep a few cooking notes in mind. First, always measure your ingredients accurately. This ensures the right texture and flavor. For instance, too much almond flour can make the bars dry, while too little can make them crumbly. Second, if you prefer a chewier texture, consider adding a bit more rolled oats. They help bind the ingredients together while providing a satisfying chew.
Additionally, be mindful of your oven’s temperature. Ovens can vary, so it’s a good idea to check the bars a few minutes before the suggested baking time. If the edges are golden brown and the center looks set, they are likely ready. Lastly, allow the bars to cool completely before cutting. This helps them firm up and makes slicing easier. Following these tips will help you achieve the best results with your Gluten-Free Bliss Bars!
Serving Suggestions for Gluten-Free Bliss Bars Recipe
Gluten-Free Bliss Bars are versatile and can be enjoyed in many ways. For a delightful breakfast, pair a bar with a cup of yogurt and fresh fruit. This combination adds protein and nutrients to your morning meal. If you’re looking for a quick snack, enjoy a bar with a glass of almond milk or your favorite plant-based milk. The creamy texture complements the chewy bars perfectly.
For dessert, consider drizzling melted dark chocolate over the bars for an extra indulgent treat. You can also serve them with a scoop of dairy-free ice cream for a delicious sundae. If you’re hosting a gathering, cut the bars into smaller squares and arrange them on a platter. They make a great addition to any dessert table. No matter how you serve them, these Gluten-Free Bliss Bars are sure to be a hit!
Tips for Perfecting Your Gluten-Free Bliss Bars Recipe
To ensure your Gluten-Free Bliss Bars turn out perfectly every time, here are some helpful tips. First, always use fresh ingredients. Old baking soda or stale oats can affect the texture and taste of your bars. Second, experiment with different sweeteners. While honey and maple syrup are great, you can also try agave nectar or coconut sugar for a unique flavor.
Another tip is to let your imagination run wild with add-ins. Consider adding seeds like chia or flax for added nutrition. You can also mix in nut butter swirls for a fun twist. Lastly, don’t be afraid to adjust the sweetness to your liking. Taste the mixture before baking and add more sweetener if desired. With these tips, you’ll be well on your way to creating the perfect batch of Gluten-Free Bliss Bars!
Breakdown of Time for Gluten-Free Bliss Bars Recipe
Prep Time
The prep time for making Gluten-Free Bliss Bars is approximately 15 minutes. This includes gathering your ingredients and mixing them together. It’s a quick and easy process that anyone can manage!
Cooking Time
Once you’ve prepared the mixture, the cooking time is about 20-25 minutes. Keep an eye on the bars as they bake to ensure they don’t overcook. The golden edges are a good indicator that they are ready.
Total Time
In total, you can expect to spend around 35-40 minutes from start to finish. This includes both prep and cooking time. With such a short time commitment, you can enjoy homemade Gluten-Free Bliss Bars in no time!
Nutritional Information for Gluten-Free Bliss Bars Recipe
Calories
Each serving of Gluten-Free Bliss Bars contains approximately 180 calories. This makes them a satisfying yet guilt-free treat.
Protein
With about 5 grams of protein per serving, these bars provide a good source of energy. The combination of almond flour and almond butter contributes to this protein content.
Sodium
The sodium content in each serving is relatively low, thanks to the minimal use of salt. This makes them a heart-healthy option for snacking.
FAQs About Gluten-Free Bliss Bars Recipe
Can I substitute ingredients in the Gluten-Free Bliss Bars Recipe?
Absolutely! You can substitute almond flour with other gluten-free flours, like coconut flour or oat flour. Just keep in mind that the texture may vary. You can also swap almond butter for peanut butter or sunflower seed butter.
How long do Gluten-Free Bliss Bars last?
When stored in an airtight container, Gluten-Free Bliss Bars can last up to a week at room temperature. For longer storage, consider refrigerating them, where they can last up to two weeks.
Are Gluten-Free Bliss Bars suitable for kids?
Yes! These bars are a great snack for kids. They are nutritious and delicious, making them a perfect treat for lunchboxes or after-school snacks.
Can I freeze Gluten-Free Bliss Bars?
Yes, you can freeze these bars! Wrap them individually in plastic wrap and place them in a freezer-safe bag. They can last up to three months in the freezer. Just thaw them at room temperature before enjoying!
Conclusion on Gluten-Free Bliss Bars Recipe
In conclusion, Gluten-Free Bliss Bars are a delightful and nutritious treat that everyone can enjoy. With simple ingredients and easy preparation, they make for a perfect snack or dessert. Whether you choose to customize them with different flavors or stick to the classic recipe, these bars are sure to satisfy your cravings. So, gather your ingredients and start baking today. You won’t regret it!
Cooking Note for Gluten-Free Bliss Bars Recipe
When preparing your Gluten-Free Bliss Bars, there are a few important cooking notes to keep in mind. First, always measure your ingredients accurately. This is crucial for achieving the right texture and flavor. For example, using too much almond flour can lead to dry bars, while too little can make them crumbly.
Next, consider the type of oats you use. Make sure to choose certified gluten-free rolled oats if you are strictly avoiding gluten. This ensures that your bars remain safe for those with gluten sensitivities. Additionally, if you prefer a chewier texture, you can add a bit more rolled oats. They help bind the ingredients together while providing a satisfying chew.
Another tip is to keep an eye on your oven’s temperature. Ovens can vary, so it’s wise to check the bars a few minutes before the suggested baking time. If the edges are golden brown and the center looks set, they are likely ready. Remember, the bars will continue to firm up as they cool.
Lastly, allow the bars to cool completely before cutting them. This helps them firm up and makes slicing easier. If you cut them too soon, they may crumble. Following these cooking notes will help you achieve the best results with your Gluten-Free Bliss Bars!
Serving Suggestions for Gluten-Free Bliss Bars Recipe
Gluten-Free Bliss Bars are not only delicious but also versatile, making them perfect for various occasions. Here are some delightful serving suggestions to enhance your experience:
For a wholesome breakfast, pair a bar with a dollop of Greek yogurt and a sprinkle of fresh berries. This combination adds protein and antioxidants, making your morning meal both nutritious and satisfying.
If you’re looking for a quick snack, enjoy a bar alongside a glass of almond milk or your favorite plant-based milk. The creamy texture of the milk complements the chewy bars perfectly, creating a delightful treat.
For a sweet dessert, consider drizzling melted dark chocolate over the bars. This extra touch of indulgence elevates the flavor and makes for a decadent treat. You can also serve them with a scoop of dairy-free ice cream for a delightful sundae experience.
When hosting a gathering, cut the bars into smaller squares and arrange them on a platter. They make a great addition to any dessert table, appealing to both gluten-free and non-gluten-free guests alike. You can even garnish the platter with fresh fruit or nuts for an attractive presentation.
Lastly, for a fun twist, try crumbling the bars over a bowl of oatmeal or smoothie bowl. This adds a crunchy texture and a burst of flavor, making your breakfast or snack even more enjoyable.
No matter how you choose to serve them, these Gluten-Free Bliss Bars are sure to be a hit with everyone!
Tips for Perfecting Your Gluten-Free Bliss Bars Recipe
To ensure your Gluten-Free Bliss Bars turn out perfectly every time, here are some helpful tips. First, always use fresh ingredients. Old baking soda or stale oats can affect the texture and taste of your bars. Fresh ingredients will help you achieve the best flavor and consistency.
Second, experiment with different sweeteners. While honey and maple syrup are great, you can also try agave nectar or coconut sugar for a unique flavor. Each sweetener brings its own taste, so feel free to find what you love best!
Another tip is to let your imagination run wild with add-ins. Consider adding seeds like chia or flax for added nutrition. You can also mix in nut butter swirls for a fun twist. These additions not only enhance the flavor but also boost the nutritional value of your bars.
Don’t be afraid to adjust the sweetness to your liking. Taste the mixture before baking and add more sweetener if desired. This way, you can customize the bars to suit your palate perfectly.
Lastly, pay attention to the baking time. Ovens can vary, so check your bars a few minutes before the suggested time. If the edges are golden brown and the center looks set, they are likely ready. Remember, the bars will continue to firm up as they cool, so don’t worry if they seem a bit soft right out of the oven.
With these tips, you’ll be well on your way to creating the perfect batch of Gluten-Free Bliss Bars every time!
Breakdown of Time for Gluten-Free Bliss Bars Recipe
Prep Time
The prep time for making Gluten-Free Bliss Bars is approximately 15 minutes. This includes gathering your ingredients and mixing them together. It’s a quick and easy process that anyone can manage! Having everything ready will make your baking experience enjoyable and efficient.
Cooking Time
Once you’ve prepared the mixture, the cooking time is about 20-25 minutes. Keep an eye on the bars as they bake to ensure they don’t overcook. The golden edges are a good indicator that they are ready. Remember, the center may look a bit soft, but it will firm up as it cools.
Total Time
In total, you can expect to spend around 35-40 minutes from start to finish. This includes both prep and cooking time. With such a short time commitment, you can enjoy homemade Gluten-Free Bliss Bars in no time! It’s a perfect treat for busy days when you need a quick snack or dessert.
Nutritional Information for Gluten-Free Bliss Bars Recipe
Calories
Each serving of Gluten-Free Bliss Bars contains approximately 180 calories. This makes them a satisfying yet guilt-free treat. With a balance of healthy fats and natural sugars, these bars provide energy without the crash that comes from processed snacks. Enjoying a bar as part of a balanced diet can help keep your energy levels steady throughout the day.
Protein
With about 5 grams of protein per serving, these bars provide a good source of energy. The combination of almond flour and almond butter contributes to this protein content. Protein is essential for muscle repair and growth, making these bars a great post-workout snack. Plus, the protein helps keep you feeling full longer, reducing the temptation to reach for less healthy options.
Sodium
The sodium content in each serving is relatively low, thanks to the minimal use of salt. This makes them a heart-healthy option for snacking. Keeping sodium levels in check is important for maintaining healthy blood pressure. Enjoying these bars as part of a varied diet can help you stay within your daily sodium limits while still satisfying your sweet tooth.
FAQs About Gluten-Free Bliss Bars Recipe
Can I substitute ingredients in the Gluten-Free Bliss Bars Recipe?
Absolutely! You can easily substitute ingredients in the Gluten-Free Bliss Bars recipe. For instance, if you don’t have almond flour, you can use coconut flour or oat flour. Just remember that the texture may change slightly. If you’re allergic to nuts, swap almond butter for sunflower seed butter. This keeps the bars nut-free while still being delicious. Feel free to experiment with different sweeteners too, like agave nectar or brown rice syrup, to find your perfect flavor!
How long do Gluten-Free Bliss Bars last?
When stored properly, Gluten-Free Bliss Bars can last up to a week at room temperature. Just keep them in an airtight container to maintain freshness. If you want them to last longer, you can refrigerate them, where they can stay good for up to two weeks. This makes them a great option for meal prep or snacks throughout the week!
Are Gluten-Free Bliss Bars suitable for kids?
Yes! Gluten-Free Bliss Bars are a fantastic snack for kids. They are not only tasty but also packed with nutrients. The combination of oats, almond flour, and almond butter provides energy and keeps little tummies satisfied. Plus, kids love the chocolate chips! These bars make a great addition to lunchboxes or after-school snacks, ensuring your kids enjoy something healthy and delicious.
Can I freeze Gluten-Free Bliss Bars?
Yes, you can freeze Gluten-Free Bliss Bars! To do this, wrap each bar individually in plastic wrap and place them in a freezer-safe bag. They can last up to three months in the freezer. When you’re ready to enjoy one, simply thaw it at room temperature for a few hours. This way, you can always have a tasty treat on hand whenever you need a quick snack!
Conclusion on Gluten-Free Bliss Bars Recipe
In conclusion, Gluten-Free Bliss Bars are not just a treat; they are a wholesome snack that everyone can enjoy. With their delightful combination of flavors and textures, these bars are perfect for any occasion. Whether you need a quick breakfast, a midday snack, or a sweet dessert, they fit the bill perfectly.
Making these bars at home allows you to control the ingredients, ensuring they are both healthy and delicious. Plus, the recipe is incredibly versatile. You can easily customize it to suit your taste preferences or dietary needs. From nut-free options to vegan adaptations, the possibilities are endless!
As you embark on your baking journey, remember to have fun and experiment with different flavors and add-ins. Each batch can be a new adventure, bringing unique tastes to your table. So, gather your ingredients, follow the steps, and enjoy the process of creating these delightful Gluten-Free Bliss Bars.
Once you’ve made your first batch, you’ll likely find yourself coming back for more. They are sure to become a favorite in your household. So, why wait? Start baking today and treat yourself to the bliss of these delicious bars!
Gluten-Free Bliss Bars
Ingredients
Equipment
Method
- Gather all your ingredients to make the process smoother.
- Preheat your oven to 350°F (175°C) and line an 8×8-inch baking pan with parchment paper.
- In a large mixing bowl, combine almond flour, rolled oats, brown sugar, shredded coconut, baking soda, and salt. Mix well.
- In a separate bowl, whisk together almond butter, honey or maple syrup, and vanilla extract until smooth. Pour into the dry ingredients and mix until fully combined. Fold in chocolate chips.
- Spread the mixture evenly in the prepared baking pan and press down firmly.
- Bake for 20-25 minutes until the edges are golden brown. Let cool for 10 minutes.
- Lift the bars out using the parchment overhang, cool completely on a wire rack, and cut into squares.