Introduction to Lemon Bliss Bars Recipe
If you’re looking for a delightful dessert that combines a zesty flavor with a sweet touch, then the Lemon Bliss Bars Recipe is just what you need! These bars are not only easy to make but also perfect for any occasion. Whether you’re hosting a summer picnic, celebrating a birthday, or simply craving something sweet, these lemon bars will surely impress your family and friends.
The bright, tangy taste of fresh lemons paired with a buttery crust creates a heavenly treat. Plus, they are a great way to use up any extra lemons you might have lying around. With just a handful of ingredients, you can whip up a batch of these delicious bars in no time. The best part? They are light and refreshing, making them a guilt-free indulgence!
In this article, we will guide you through the entire process of making Lemon Bliss Bars, from gathering the ingredients to serving them up. You’ll find step-by-step instructions, tips for variations, and even nutritional information. So, roll up your sleeves and get ready to enjoy a slice of sunshine with this delightful Lemon Bliss Bars Recipe!
Ingredients for Lemon Bliss Bars Recipe
To create the perfect Lemon Bliss Bars, you’ll need a few simple ingredients. Each component plays a vital role in achieving that delightful balance of sweetness and tanginess. Here’s what you’ll need:
- 1 cup almond flour
- 1/4 cup coconut flour
- 1/2 cup granulated sugar (for the crust)
- 1/4 teaspoon salt
- 1/2 cup unsalted butter, melted
- 2 large eggs
- 1 cup granulated sugar (for the filling)
- 1/4 cup fresh lemon juice
- 1 tablespoon lemon zest
- 1/4 teaspoon baking powder
- Powdered sugar for dusting (optional)
These ingredients come together to create a deliciously rich crust and a creamy lemon filling. The almond and coconut flours provide a unique texture, while the fresh lemon juice and zest give that refreshing zing. Don’t forget the powdered sugar for a lovely finishing touch! Now that you have your ingredients ready, let’s move on to the next step of making these delightful bars.
Step-by-Step Preparation of Lemon Bliss Bars Recipe
Step 1: Preparing the Crust for Lemon Bliss Bars Recipe
To start, you’ll want to prepare the crust for your Lemon Bliss Bars. First, grab a mixing bowl and combine the almond flour, coconut flour, 1/2 cup of granulated sugar, and salt. Mix these dry ingredients well to ensure they are evenly distributed. Next, pour in the melted unsalted butter. Stir everything together until the mixture becomes crumbly and well combined.
Now, take your prepared baking dish and press the crust mixture evenly into the bottom. Make sure it’s packed tightly to create a solid base for your bars. Once you’ve done that, pop it into the preheated oven. Bake for about 15 minutes or until the crust turns a lovely golden brown. This step is crucial as it sets the foundation for your delicious Lemon Bliss Bars!
Step 2: Making the Lemon Filling for Lemon Bliss Bars Recipe
While the crust is baking, it’s time to whip up the lemon filling. In a separate bowl, crack the two large eggs and whisk them together. Then, add in the 1 cup of granulated sugar, fresh lemon juice, lemon zest, and baking powder. Whisk these ingredients until the mixture is smooth and well combined. The lemon juice and zest will give your filling that bright, zesty flavor that makes these bars so special.
Once your filling is ready, set it aside until the crust is done baking. This way, you can pour it directly onto the hot crust, which helps the filling set better during baking.
Step 3: Baking the Lemon Bliss Bars Recipe
After the crust has baked and cooled slightly, it’s time to add the lemon filling. Carefully pour the lemon mixture over the baked crust, spreading it evenly. Return the baking dish to the oven and bake for an additional 20-25 minutes. You’ll know it’s done when the filling is set and slightly firm to the touch. Keep an eye on it to avoid overbaking, as you want that creamy texture!
Step 4: Cooling and Serving the Lemon Bliss Bars Recipe
Once your Lemon Bliss Bars are baked to perfection, remove them from the oven and let them cool completely in the pan on a wire rack. This cooling step is important, as it allows the filling to firm up. After they’ve cooled, place the pan in the refrigerator for at least 1 hour. This chilling time makes slicing easier and enhances the flavors.
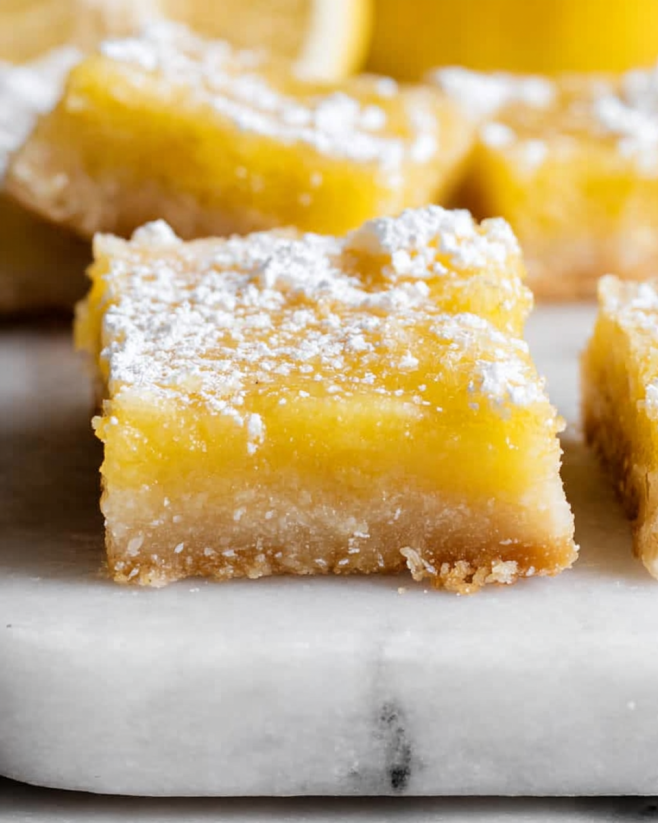
When you’re ready to serve, take the bars out of the fridge and dust them with powdered sugar for a beautiful finish. Slice them into squares and enjoy your delightful Lemon Bliss Bars! They’re perfect for sharing or savoring all by yourself.
Variations of Lemon Bliss Bars Recipe
Gluten-Free Lemon Bliss Bars Recipe
If you’re looking for a gluten-free option, you’re in luck! The Lemon Bliss Bars Recipe can easily be adapted to meet gluten-free needs. The original recipe already uses almond flour and coconut flour, both of which are naturally gluten-free. Just make sure to check that your ingredients, especially the baking powder, are certified gluten-free.
For an extra twist, you can add a bit of ground flaxseed to the crust. This not only enhances the flavor but also adds a nutritional boost. Simply replace a tablespoon of almond flour with ground flaxseed. The result? A deliciously nutty crust that pairs perfectly with the zesty lemon filling!
Vegan Lemon Bliss Bars Recipe
Craving a vegan version of these delightful bars? No problem! You can easily make the Lemon Bliss Bars Recipe vegan by substituting the eggs and butter. For the eggs, use flax eggs. To make one flax egg, mix 1 tablespoon of ground flaxseed with 2.5 tablespoons of water. Let it sit for about 5 minutes until it thickens.
For the butter, simply replace it with coconut oil or a vegan butter alternative. This will keep the bars rich and creamy while ensuring they remain plant-based. The rest of the ingredients can stay the same, allowing you to enjoy the same bright, tangy flavor without any animal products!
These variations not only cater to different dietary needs but also keep the essence of the Lemon Bliss Bars intact. Whether you choose the gluten-free or vegan option, you’ll still enjoy a deliciously refreshing treat!
Cooking Note for Lemon Bliss Bars Recipe
When making the Lemon Bliss Bars Recipe, there are a few important cooking notes to keep in mind. These tips will help ensure that your bars turn out perfectly every time!
First, always preheat your oven. This step is crucial for even baking. If the oven isn’t hot enough, the crust may not set properly, leading to a soggy bottom. So, make sure to set your oven to 350°F (175°C) before you start mixing your ingredients.
Next, be mindful of the baking time. Ovens can vary, so keep an eye on your bars as they bake. The crust should be lightly golden, and the filling should be set but still slightly jiggly in the center. If you overbake, the filling can become dry and lose its creamy texture.
Additionally, let the bars cool completely in the pan. This cooling period allows the filling to firm up, making it easier to slice. If you’re in a hurry, you can place the pan in the refrigerator to speed up the cooling process.
Lastly, for the best flavor, use fresh lemons. Fresh lemon juice and zest will give your bars that vibrant, zesty taste that bottled lemon juice simply can’t match. The freshness of the ingredients truly makes a difference in the final product!
By following these cooking notes, you’ll be well on your way to creating delicious Lemon Bliss Bars that everyone will love. Happy baking!
Serving Suggestions for Lemon Bliss Bars Recipe
When it comes to serving your delightful Lemon Bliss Bars, the options are endless! These bars are not only delicious but also versatile, making them perfect for various occasions. Here are some creative serving suggestions to elevate your dessert experience:
- Fresh Berries: Serve your Lemon Bliss Bars with a side of fresh berries, such as strawberries, blueberries, or raspberries. The tartness of the berries complements the sweet and tangy flavor of the bars beautifully.
- Whipped Cream: A dollop of whipped cream adds a creamy texture that pairs wonderfully with the zesty lemon filling. You can even flavor the whipped cream with a hint of vanilla or lemon zest for an extra touch.
- Iced Tea or Lemonade: For a refreshing drink pairing, serve your bars with a glass of iced tea or homemade lemonade. The citrus notes in the drink will enhance the lemony goodness of the bars.
- Ice Cream: For a decadent treat, top your Lemon Bliss Bars with a scoop of vanilla or lemon sorbet ice cream. The cold, creamy ice cream contrasts nicely with the warm, zesty bars.
- Garnish with Mint: Add a sprig of fresh mint on top of each bar for a pop of color and a refreshing flavor. This simple garnish can make your dessert look even more appealing!
These serving suggestions not only enhance the presentation of your Lemon Bliss Bars but also add layers of flavor that everyone will enjoy. Whether you’re hosting a gathering or enjoying a quiet evening at home, these ideas will make your dessert experience even more delightful!
Tips for Perfecting Your Lemon Bliss Bars Recipe
To ensure your Lemon Bliss Bars turn out perfectly every time, consider these helpful tips. They will guide you through the process and help you achieve that ideal balance of sweetness and tanginess.
- Use Fresh Ingredients: Always opt for fresh lemons when making your bars. Fresh lemon juice and zest provide a vibrant flavor that bottled alternatives simply can’t match. The freshness will elevate your dessert!
- Measure Accurately: Baking is a science, so precise measurements are key. Use a kitchen scale for the flours and sugar if possible. This ensures consistency in texture and taste.
- Don’t Overmix: When combining the crust ingredients, mix just until they are combined. Overmixing can lead to a tough crust. Aim for a crumbly texture that holds together when pressed.
- Check for Doneness: Keep an eye on your bars while they bake. The filling should be set but still slightly jiggly in the center. If it looks too firm, it may have overbaked.
- Cool Completely: Allow your bars to cool completely in the pan before slicing. This helps the filling firm up, making it easier to cut into neat squares. If you’re in a hurry, refrigerate them for a quicker cool-down.
- Experiment with Flavors: Feel free to get creative! Add a hint of vanilla extract to the filling or try different citrus fruits like lime or orange for a unique twist on the classic recipe.
- Store Properly: To keep your Lemon Bliss Bars fresh, store them in an airtight container in the refrigerator. They can last up to a week, making them a great make-ahead dessert!
By following these tips, you’ll be well on your way to creating Lemon Bliss Bars that are not only delicious but also visually appealing. Enjoy the process and happy baking!
Breakdown of Time for Lemon Bliss Bars Recipe
Prep Time for Lemon Bliss Bars Recipe
Preparing your Lemon Bliss Bars is a breeze! The prep time for this delightful recipe is approximately 15-20 minutes. During this time, you’ll gather all your ingredients, mix the crust, and prepare the lemon filling. It’s a quick and easy process that allows you to enjoy the fun of baking without spending hours in the kitchen.
Cooking Time for Lemon Bliss Bars Recipe
The cooking time for your Lemon Bliss Bars is about 35-40 minutes. This includes 15 minutes for baking the crust and an additional 20-25 minutes for baking the lemon filling. Keep an eye on your bars as they bake to ensure they reach that perfect golden crust and set filling. Remember, the key is to avoid overbaking, so check for doneness as the timer approaches!
Total Time for Lemon Bliss Bars Recipe
In total, you can expect to spend around 55-60 minutes from start to finish, not including the cooling and chilling time. After baking, it’s essential to let your bars cool completely in the pan. Then, refrigerate them for at least 1 hour before slicing. This chilling time enhances the flavors and makes cutting easier. So, while the active time is short, plan for a little patience to enjoy the best results!
Nutritional Information for Lemon Bliss Bars Recipe
Calories in Lemon Bliss Bars Recipe
When indulging in the delightful Lemon Bliss Bars, it’s good to know the calorie content. Each serving contains approximately 180 calories. This makes them a relatively light dessert option, especially when compared to many other sweet treats. Enjoying a slice of these bars can satisfy your sweet tooth without overwhelming your daily calorie intake!
Protein Content in Lemon Bliss Bars Recipe
For those keeping an eye on their protein intake, each serving of Lemon Bliss Bars provides about 3 grams of protein. While this may not seem like a lot, the protein comes from the eggs and almond flour, contributing to a balanced treat. Pairing these bars with a protein-rich snack, like a handful of nuts, can help round out your nutritional needs.
Sodium Levels in Lemon Bliss Bars Recipe
In terms of sodium, each serving of the Lemon Bliss Bars contains roughly 100 milligrams. This is a moderate amount, making these bars a suitable option for most diets. However, if you’re watching your sodium intake, be mindful of any additional toppings or accompaniments you may add when serving.
FAQs about Lemon Bliss Bars Recipe
Can I make Lemon Bliss Bars Recipe ahead of time?
Absolutely! The Lemon Bliss Bars Recipe is perfect for making ahead of time. In fact, they taste even better after chilling in the refrigerator for a few hours or overnight. This allows the flavors to meld beautifully. Just prepare the bars as directed, let them cool completely, and then refrigerate. When you’re ready to serve, simply slice and enjoy!
How should I store Lemon Bliss Bars Recipe?
To keep your Lemon Bliss Bars fresh, store them in an airtight container in the refrigerator. They can last up to a week, making them a great make-ahead dessert option. If you want to keep them for longer, you can freeze the bars. Just wrap them tightly in plastic wrap and then place them in a freezer-safe container. When you’re ready to enjoy, thaw them in the fridge overnight.
Can I substitute ingredients in Lemon Bliss Bars Recipe?
Yes, you can! The Lemon Bliss Bars Recipe is quite flexible. For instance, if you need a gluten-free option, stick with almond and coconut flour, as mentioned earlier. If you want to make it vegan, use flax eggs and coconut oil instead of regular eggs and butter. You can also experiment with different citrus fruits, like lime or orange, for a unique twist. Just remember that any substitutions may slightly alter the texture and flavor, but they can still be delicious!
Conclusion on Lemon Bliss Bars Recipe
In conclusion, the Lemon Bliss Bars Recipe is a delightful treat that brings a burst of sunshine to any occasion. With its simple ingredients and easy preparation, you can create a dessert that is both refreshing and satisfying. Whether you’re enjoying them at a summer gathering or as a sweet pick-me-up during the week, these bars are sure to please everyone.
The combination of a buttery crust and a tangy lemon filling creates a perfect balance of flavors. Plus, with the option to customize the recipe for gluten-free or vegan diets, everyone can enjoy this delicious dessert. Remember to follow the tips and variations provided to make your Lemon Bliss Bars truly unique!
So, gather your ingredients, roll up your sleeves, and get ready to bake. Your friends and family will be impressed by your baking skills, and you’ll love the joy these bars bring. Enjoy every bite of your Lemon Bliss Bars, and don’t forget to share the recipe with others. Happy baking!
Lemon Bliss Bars
Ingredients
Equipment
Method
- Preheat the oven to 350°F (175°C). In a mixing bowl, combine almond flour, coconut flour, 1/2 cup of granulated sugar, and salt. Mix well. Pour in melted butter and stir until crumbly. Press the mixture into the bottom of a baking dish and bake for 15 minutes until golden brown.
- In a separate bowl, whisk together the eggs, 1 cup of granulated sugar, fresh lemon juice, lemon zest, and baking powder until smooth. Set aside until the crust is done baking.
- Pour the lemon filling over the baked crust and return to the oven. Bake for an additional 20-25 minutes until the filling is set and slightly firm to the touch.
- Let the bars cool completely in the pan on a wire rack. Refrigerate for at least 1 hour before slicing. Dust with powdered sugar before serving.