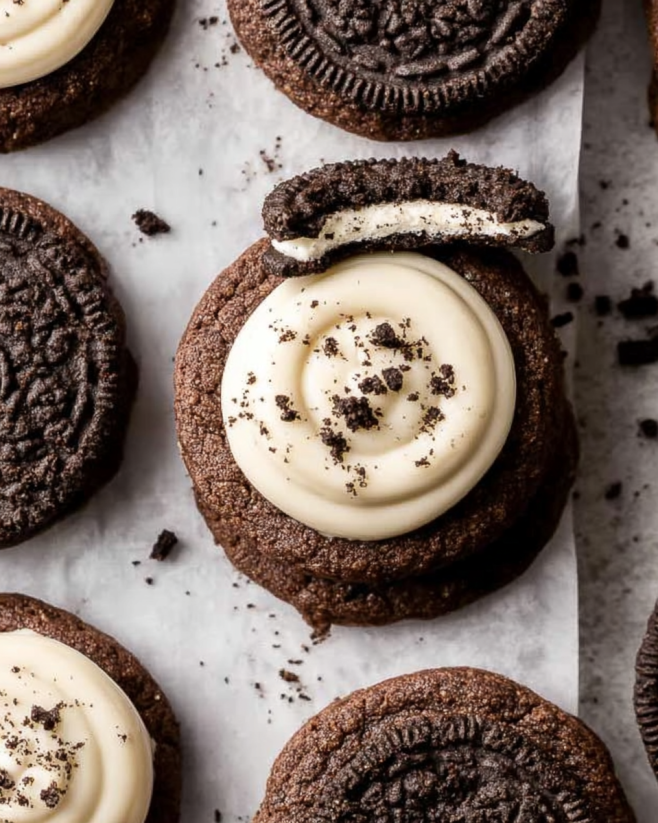
Introduction to Gluten-Free Oreo Cookies
Gluten-free Oreo cookies are a delightful treat that brings joy to many, especially those with gluten sensitivities or celiac disease. These cookies not only satisfy your sweet tooth but also allow everyone to enjoy a classic favorite without worry. With their rich chocolate flavor and creamy texture, gluten-free Oreo cookies are a perfect addition to any dessert table.
What Makes Gluten-Free Oreo Cookies Special?
What sets gluten-free Oreo cookies apart is their ability to deliver the same delicious taste and texture as traditional cookies, without the gluten. By using gluten-free all-purpose flour and other carefully selected ingredients, these cookies maintain a soft and chewy consistency. The crushed gluten-free chocolate sandwich cookies add an extra layer of flavor, making each bite a delightful experience. Plus, they are easy to make, allowing anyone to whip up a batch in no time!
The Rise in Popularity of Gluten-Free Treats
In recent years, gluten-free treats have surged in popularity. More people are becoming aware of gluten intolerance and celiac disease, leading to a growing demand for gluten-free options. As a result, many bakeries and home cooks are experimenting with gluten-free recipes. This trend has made it easier for those with dietary restrictions to enjoy delicious desserts like gluten-free Oreo cookies. The versatility of gluten-free baking means that everyone can indulge, regardless of their dietary needs.
Ingredients for Gluten-Free Oreo Cookies
To create the perfect batch of gluten-free Oreo cookies, you’ll need a selection of simple yet essential ingredients. Each component plays a vital role in achieving that rich, chocolatey flavor and delightful texture. Here’s what you’ll need:
- 1 cup gluten-free all-purpose flour: This is the base of your cookies. It provides structure without gluten.
- 1/2 cup unsweetened cocoa powder: Cocoa powder adds a deep chocolate flavor, making your cookies rich and indulgent.
- 1/2 teaspoon baking soda: This leavening agent helps the cookies rise and become fluffy.
- 1/4 teaspoon salt: A pinch of salt enhances the sweetness and balances the flavors.
- 1/2 cup unsalted butter, softened: Butter adds moisture and richness, making the cookies tender.
- 1 cup brown sugar, packed: Brown sugar contributes to the cookies’ chewiness and adds a hint of caramel flavor.
- 1/4 cup granulated sugar: This sugar helps to create a nice crisp edge on the cookies.
- 1 large egg: The egg binds the ingredients together and adds moisture.
- 1 teaspoon vanilla extract: Vanilla enhances the overall flavor, making the cookies even more delicious.
- 1 cup gluten-free chocolate sandwich cookies, crushed: These cookies provide texture and a burst of chocolate flavor in every bite.
- 1/2 cup chocolate chips: Chocolate chips add extra chocolatey goodness and make the cookies even more irresistible.
With these ingredients on hand, you’re ready to embark on your baking adventure. Each item contributes to the delightful taste and texture of gluten-free Oreo cookies, ensuring that everyone can enjoy a sweet treat!
Step-by-Step Preparation of Gluten-Free Oreo Cookies
Now that you have all your ingredients ready, it’s time to dive into the fun part: making your gluten-free Oreo cookies! Follow these simple steps to create a batch of delicious cookies that everyone will love.
Step 1: Gather Your Ingredients
Before you start baking, make sure you have everything you need. Gather your ingredients and tools, including:
- Measuring cups and spoons
- Mixing bowls
- A whisk or electric mixer
- A cookie scoop or tablespoon
- Parchment paper for lining the baking sheet
Having everything in place will make the process smoother and more enjoyable!
Step 2: Prepare the Cookie Dough
In a medium bowl, whisk together the gluten-free all-purpose flour, cocoa powder, baking soda, and salt. This mixture is your dry ingredients. Set it aside for now.
Next, in a large mixing bowl, cream together the softened butter, brown sugar, and granulated sugar. Mix until the mixture is light and fluffy, which should take about 2-3 minutes. Then, add the egg and vanilla extract. Mix until everything is well combined.
Now, gradually add the dry ingredients to the wet mixture. Stir until just combined. Be careful not to overmix, as this can affect the texture of your cookies.
Step 3: Shape the Cookies
Once your dough is ready, it’s time to fold in the crushed gluten-free chocolate sandwich cookies and chocolate chips. This step adds a delightful crunch and extra chocolate flavor!
Using a cookie scoop or a tablespoon, drop the dough onto the prepared baking sheet. Make sure to space them about 2 inches apart. This allows room for the cookies to spread while baking.
Step 4: Bake the Cookies
Preheat your oven to 350°F (175°C) if you haven’t done so already. Place the baking sheet in the oven and bake the cookies for 10-12 minutes. You want the edges to be set while the centers remain soft. This will give you that perfect chewy texture!
Step 5: Cool and Assemble the Cookies
After baking, allow the cookies to cool on the baking sheet for about 5 minutes. This helps them firm up a bit. Then, transfer them to a wire rack to cool completely. Once cooled, you can enjoy them as they are or even sandwich them with your favorite frosting for an extra treat!
And there you have it! A simple, step-by-step guide to making gluten-free Oreo cookies that are sure to impress. Happy baking!
Variations of Gluten-Free Oreo Cookies
While the classic gluten-free Oreo cookies are delicious on their own, there are many fun variations to explore! By changing a few ingredients or adding new flavors, you can create unique treats that cater to different tastes. Let’s dive into some exciting options!
Different Flavors to Try
If you’re feeling adventurous, consider experimenting with different flavors in your gluten-free Oreo cookies. Here are a few ideas:
- Mint Chocolate: Add a few drops of peppermint extract to the dough for a refreshing minty twist. You can also mix in some crushed mint chocolate candies for extra flavor.
- Peanut Butter: Swirl in some creamy peanut butter into the dough. This will give your cookies a rich, nutty flavor that pairs perfectly with chocolate.
- Espresso: For coffee lovers, add a teaspoon of instant espresso powder to the dry ingredients. This will enhance the chocolate flavor and give your cookies a delightful coffee kick.
- Almond Joy: Mix in shredded coconut and chopped almonds along with the chocolate chips. This will create a cookie reminiscent of the popular candy bar!
These variations not only add new flavors but also make your gluten-free Oreo cookies even more exciting to enjoy!
Vegan Options for Gluten-Free Oreo Cookies
For those following a vegan diet, you can easily adapt the gluten-free Oreo cookie recipe. Here’s how:
- Butter Substitute: Replace the unsalted butter with coconut oil or a vegan butter alternative. Make sure it’s softened for easy mixing.
- Egg Replacement: Use a flax egg instead of a regular egg. To make a flax egg, mix 1 tablespoon of ground flaxseed with 2.5 tablespoons of water. Let it sit for about 5 minutes until it thickens.
- Chocolate Chips: Ensure that the chocolate chips you use are dairy-free. Many brands offer vegan chocolate chips that are perfect for this recipe.
With these simple substitutions, you can enjoy delicious vegan gluten-free Oreo cookies that everyone will love!
Cooking Note for Gluten-Free Oreo Cookies
Baking gluten-free Oreo cookies can be a delightful experience, but there are a few important cooking notes to keep in mind. These tips will help ensure that your cookies turn out perfectly every time, providing that rich flavor and chewy texture everyone loves.
First, always check your gluten-free flour blend. Not all blends are created equal. Some may contain xanthan gum, while others do not. If your blend lacks xanthan gum, consider adding about 1/4 teaspoon to help bind the ingredients together. This will improve the texture of your cookies.
Next, be mindful of the baking time. Gluten-free cookies can bake faster than traditional ones. Keep an eye on them as they approach the 10-minute mark. You want the edges to be set, but the centers should still look slightly underbaked. They will continue to firm up as they cool.
Additionally, if you prefer a chewier cookie, chilling the dough for about 30 minutes before baking can make a significant difference. This step allows the flavors to meld and helps the cookies maintain their shape while baking.
Lastly, remember that gluten-free cookies can be sensitive to humidity. If you live in a humid area, you may need to adjust the flour slightly. Adding a tablespoon more of gluten-free flour can help absorb excess moisture, ensuring your cookies don’t turn out too sticky.
By following these cooking notes, you’ll be well on your way to baking delicious gluten-free Oreo cookies that everyone will enjoy. Happy baking!
Serving Suggestions for Gluten-Free Oreo Cookies
Once your gluten-free Oreo cookies are baked and cooled, it’s time to think about how to serve them! These cookies are not only delicious on their own but can also be paired with various treats and enjoyed in creative ways. Here are some delightful serving suggestions to elevate your cookie experience.
Pairing with Milk or Dairy Alternatives
One of the classic ways to enjoy cookies is with a glass of milk. For those who are gluten-free, pairing your cookies with dairy alternatives can be just as satisfying. Consider these options:
- Almond Milk: This nutty-flavored milk complements the chocolatey goodness of the cookies perfectly.
- Coconut Milk: The creamy texture of coconut milk adds a tropical twist to your cookie experience.
- Oat Milk: Oat milk is a great choice for its smooth consistency and mild flavor, making it a wonderful pairing.
Whichever milk you choose, dunking your gluten-free Oreo cookies will enhance the flavor and make for a delightful treat!
Creative Ways to Serve Gluten-Free Oreo Cookies
Get creative with how you serve your gluten-free Oreo cookies! Here are some fun ideas:
- Cookie Ice Cream Sandwiches: Take two cookies and sandwich your favorite ice cream in between. This makes for a delicious dessert that’s perfect for warm days.
- Cookie Crumble Topping: Crush some cookies and sprinkle them over yogurt or ice cream for a crunchy topping that adds flavor and texture.
- Decorate with Frosting: Spread a layer of frosting between two cookies for a sweet treat that resembles a whoopie pie.
- Serve with Fresh Fruit: Pair your cookies with fresh berries or banana slices for a refreshing contrast to the rich chocolate flavor.
These serving suggestions will not only enhance your enjoyment of gluten-free Oreo cookies but also impress your friends and family. Whether you keep it simple or get creative, these cookies are sure to be a hit!
Tips for Perfect Gluten-Free Oreo Cookies
To ensure your gluten-free Oreo cookies turn out perfectly every time, consider these helpful tips. Baking can be a bit tricky, especially when working with gluten-free ingredients. However, with a few simple adjustments, you can achieve delicious results that everyone will love!
Common Mistakes to Avoid
When baking gluten-free cookies, it’s essential to avoid common pitfalls. Here are some mistakes to watch out for:
- Not Measuring Ingredients Accurately: Gluten-free baking requires precise measurements. Use measuring cups and spoons to ensure accuracy.
- Overmixing the Dough: Mixing too much can lead to tough cookies. Stir until just combined for the best texture.
- Skipping the Chilling Step: Chilling the dough can help improve the texture and prevent spreading. Don’t skip this step if you want chewier cookies!
- Using the Wrong Flour Blend: Not all gluten-free flours are the same. Choose a blend that works well for cookies, ideally one that contains xanthan gum.
By avoiding these mistakes, you’ll be on your way to baking perfect gluten-free Oreo cookies!
Storage Tips for Freshness
To keep your gluten-free Oreo cookies fresh, follow these storage tips:
- Cool Completely: Allow cookies to cool completely before storing. This prevents moisture buildup, which can make them soggy.
- Use an Airtight Container: Store cookies in an airtight container at room temperature. This helps maintain their texture and flavor.
- Freeze for Longer Storage: If you want to keep cookies for an extended period, consider freezing them. Place them in a freezer-safe bag or container, separating layers with parchment paper.
By following these storage tips, you can enjoy your gluten-free Oreo cookies for days to come!
Breakdown of Time for Gluten-Free Oreo Cookies
Understanding the time needed to make gluten-free Oreo cookies can help you plan your baking session better. Here’s a simple breakdown of the time involved in each step of the process.
Prep Time
The prep time for gluten-free Oreo cookies is approximately 15-20 minutes. This includes gathering your ingredients, measuring them accurately, and mixing the dough. If you choose to chill the dough for a chewier texture, add an additional 30 minutes to this time. Chilling allows the flavors to meld and helps the cookies maintain their shape while baking.
Cooking Time
Once your dough is ready, the cooking time is quite short. You’ll need about 10-12 minutes to bake the cookies in a preheated oven at 350°F (175°C). Keep an eye on them as they bake, ensuring the edges are set while the centers remain soft for that perfect chewy texture.
Total Time
In total, you can expect to spend around 25-32 minutes for the entire process, not including any chilling time. This makes gluten-free Oreo cookies a quick and easy treat to whip up, perfect for satisfying your sweet cravings or impressing guests at a gathering!
Nutritional Information for Gluten-Free Oreo Cookies
Understanding the nutritional content of gluten-free Oreo cookies can help you enjoy them guilt-free. These cookies not only satisfy your sweet cravings but also provide some essential nutrients. Let’s take a closer look at the calories and macronutrients in each serving.
Calories and Macronutrients
Each serving of gluten-free Oreo cookies contains approximately 180 calories. Here’s a breakdown of the macronutrients:
- Net Carbs: 18g
- Protein: 2g
- Fat: 9g
These cookies offer a delightful balance of flavors and textures while providing a moderate amount of energy. The combination of gluten-free flour and cocoa powder contributes to the overall nutritional profile, making them a tasty treat that can fit into a balanced diet.
Health Benefits of Gluten-Free Ingredients
Using gluten-free ingredients in your cookies can offer several health benefits, especially for those with gluten sensitivities or celiac disease. Here are some advantages:
- Digestive Health: Gluten-free flours, such as almond or coconut flour, can be easier on the digestive system for those with gluten intolerance.
- Increased Nutrient Variety: Gluten-free baking often incorporates a variety of flours, which can provide different vitamins and minerals. For example, almond flour is rich in vitamin E and healthy fats.
- Lower Glycemic Index: Some gluten-free flours have a lower glycemic index compared to traditional wheat flour, which can help maintain stable blood sugar levels.
By choosing gluten-free ingredients, you not only cater to dietary restrictions but also enhance the nutritional value of your treats. Enjoying gluten-free Oreo cookies can be a delicious way to indulge while still being mindful of your health!
FAQs about Gluten-Free Oreo Cookies
Are Gluten-Free Oreo Cookies as Good as Regular Oreos?
Many people wonder if gluten-free Oreo cookies can match the taste and texture of traditional Oreos. The good news is that gluten-free Oreo cookies can be just as delicious! With the right ingredients, you can achieve a rich chocolate flavor and a satisfying crunch. The crushed gluten-free chocolate sandwich cookies add an extra layer of taste, making them a delightful treat for everyone, regardless of dietary restrictions. So, yes, gluten-free Oreo cookies can be just as good, if not better!
Can I Make Gluten-Free Oreo Cookies Ahead of Time?
Absolutely! You can make gluten-free Oreo cookies ahead of time. In fact, they can be stored for several days without losing their deliciousness. If you want to prepare them in advance, consider baking the cookies and letting them cool completely. Then, store them in an airtight container at room temperature. If you want to keep them for a longer period, you can freeze the cookies. Just make sure to separate layers with parchment paper to prevent sticking. When you’re ready to enjoy them, simply thaw them at room temperature!
What Gluten-Free Flour Works Best for Cookies?
When it comes to gluten-free baking, choosing the right flour is crucial. A good all-purpose gluten-free flour blend works best for cookies. Look for a blend that contains a mix of different flours, such as rice flour, almond flour, and tapioca starch. Some blends also include xanthan gum, which helps bind the ingredients together. If your blend doesn’t have xanthan gum, consider adding about 1/4 teaspoon to your recipe. This will help achieve the right texture for your gluten-free Oreo cookies!
How Do I Store Gluten-Free Oreo Cookies?
To keep your gluten-free Oreo cookies fresh, follow these simple storage tips. First, allow the cookies to cool completely before storing them. This prevents moisture buildup, which can make them soggy. Next, place the cookies in an airtight container at room temperature. This helps maintain their texture and flavor. If you want to store them for a longer time, consider freezing them. Use a freezer-safe bag or container, and separate layers with parchment paper. This way, you can enjoy your cookies for weeks to come!
Conclusion on Gluten-Free Oreo Cookies
In conclusion, gluten-free Oreo cookies are a delightful treat that everyone can enjoy, regardless of dietary restrictions. With their rich chocolate flavor and chewy texture, these cookies provide a satisfying indulgence that rivals traditional cookies. The simple recipe allows for creativity, whether you choose to stick with the classic version or explore exciting variations.
By following the tips and guidelines provided, you can ensure that your gluten-free Oreo cookies turn out perfectly every time. From selecting the right ingredients to mastering the baking process, each step contributes to the overall success of your cookies. Plus, the nutritional benefits of gluten-free ingredients make these cookies a guilt-free pleasure.
So, gather your ingredients, preheat your oven, and get ready to bake a batch of gluten-free Oreo cookies that will impress your family and friends. Whether enjoyed with a glass of milk or as part of a creative dessert, these cookies are sure to bring smiles and satisfaction. Happy baking!
Gluten-Free Oreo Cookies
Ingredients
Equipment
Method
- Gather all ingredients and tools.
- Whisk together dry ingredients in a medium bowl.
- Cream together butter, brown sugar, and granulated sugar until light and fluffy, about 2-3.
- Add egg and vanilla extract, mix until combined.
- Gradually add dry ingredients to wet mixture, stir until just combined.
- Fold in crushed cookies and chocolate chips.
- Drop dough onto prepared baking sheet, spaced 2 inches apart.
- Preheat oven to 350°F. Bake for 10-12 until edges are set and centers are soft.
- Cool on baking sheet for 5 minutes, then transfer to wire rack to cool completely.