Introduction to Gluten Free Lemon Bars Recipe
Welcome to the delightful world of gluten-free baking! Today, we’re diving into a scrumptious treat that’s sure to brighten your day: the Gluten Free Lemon Bars Recipe. These bars are not only easy to make but also bursting with zesty lemon flavor. Whether you’re gluten intolerant or simply looking for a refreshing dessert, this recipe is perfect for everyone.
What Makes This Gluten Free Lemon Bars Recipe Special?
This Gluten Free Lemon Bars Recipe stands out for several reasons. First, it uses a combination of almond flour and coconut flour, which gives the crust a unique texture and flavor. Almond flour adds a nutty richness, while coconut flour contributes a subtle sweetness. Together, they create a deliciously crumbly base that perfectly complements the tangy lemon filling.
Moreover, the use of fresh lemon juice and zest elevates the taste, making each bite a burst of citrus goodness. This recipe is also versatile; you can easily customize it with alternative sweeteners or add berries for a fruity twist. Plus, it’s a crowd-pleaser! Whether served at a family gathering or a casual get-together, these lemon bars are sure to impress.
The History of Lemon Bars
Lemon bars have a rich history that dates back to the early 20th century. They are believed to have originated in the United States, with their popularity soaring during the 1960s. Traditionally, lemon bars consist of a buttery crust topped with a tangy lemon filling. Over the years, variations have emerged, but the classic combination of sweet and tart remains beloved.
As gluten-free diets became more common, bakers began to adapt this classic recipe to accommodate those with gluten sensitivities. Today, gluten-free lemon bars are enjoyed by many, proving that delicious desserts can be made without compromising on flavor or texture. So, let’s get started on making your very own batch of these delightful treats!
Ingredients for Gluten Free Lemon Bars Recipe
To create your delicious Gluten Free Lemon Bars, you’ll need a few simple ingredients. Each component plays a vital role in achieving that perfect balance of sweetness and tartness. Here’s what you’ll need:
- 1 cup almond flour
- 1/2 cup coconut flour
- 1/2 cup powdered sugar
- 1/2 cup unsalted butter, melted
- 1/4 teaspoon salt
- 4 large eggs
- 1 cup granulated sugar
- 1/2 cup fresh lemon juice (about 2-3 lemons)
- Zest of 2 lemons
- 1/4 teaspoon baking powder
These ingredients come together to create a delightful treat that’s both gluten-free and full of flavor. The almond and coconut flours provide a unique texture, while the fresh lemon juice and zest give the bars their signature tang. Remember, using fresh lemons is key to achieving that vibrant taste!
Before you start baking, make sure you have everything on hand. This will help streamline the process and ensure you don’t miss any crucial steps. Now that you have your ingredients ready, let’s move on to the step-by-step preparation of your Gluten Free Lemon Bars!
Step-by-Step Preparation of Gluten Free Lemon Bars Recipe
Now that you have all your ingredients ready, it’s time to dive into the fun part: preparing your Gluten Free Lemon Bars! Follow these simple steps to create a delicious dessert that everyone will love.
Step 1: Preparing the Crust
First, let’s get that crust ready. In a medium bowl, combine the almond flour, coconut flour, powdered sugar, melted butter, and salt. Use a fork or your hands to mix everything together until it forms a crumbly texture. This mixture should hold together when pressed.
Next, take your prepared 8×8-inch baking dish and evenly press the crust mixture into the bottom. Make sure it’s compact and covers the entire base. This will create a sturdy foundation for your lemon filling. Once you’re satisfied with the crust, it’s time to bake!
Step 2: Making the Lemon Filling
While the crust is baking, let’s whip up that zesty lemon filling! In a large bowl, crack the four eggs and whisk them until they’re well beaten. Then, add the granulated sugar, fresh lemon juice, lemon zest, and baking powder. Whisk everything together until the mixture is smooth and fully combined. The aroma of fresh lemons will surely brighten your kitchen!
Once the crust is lightly golden and slightly cooled, pour the lemon filling over it. Make sure to spread it evenly for a consistent texture throughout the bars.
Step 3: Baking the Bars
Now, it’s time to return the dish to the oven. Bake the lemon bars for an additional 20-25 minutes. You’ll know they’re done when the filling is set and the edges are lightly golden. Keep an eye on them to avoid overbaking, as you want that perfect balance of creamy and firm.
Step 4: Cooling and Serving
After baking, remove the dish from the oven and let it cool completely at room temperature. This step is crucial, as it allows the filling to firm up. Once cooled, cover the dish and refrigerate for at least 2 hours. Chilling the bars enhances their flavor and makes them easier to cut.
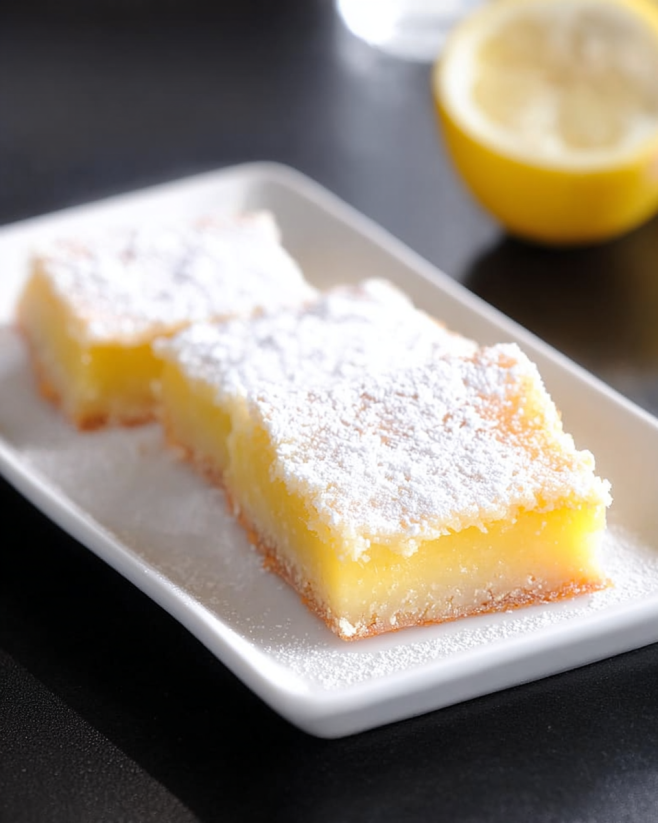
When you’re ready to serve, take the bars out of the fridge and cut them into squares. For an extra touch, dust them with powdered sugar before serving. Enjoy your delightful Gluten Free Lemon Bars chilled or at room temperature!
Variation of Gluten Free Lemon Bars Recipe
While the classic Gluten Free Lemon Bars Recipe is already a hit, there are plenty of ways to switch things up! Whether you want to adjust the sweetness or add a new flavor, these variations will keep your taste buds excited. Let’s explore some alternative sweeteners and flavor variations that can elevate your lemon bars to the next level.
Alternative Sweeteners
If you’re looking to reduce sugar or try something different, consider using alternative sweeteners. Here are a few options:
- Honey: A natural sweetener that adds a unique flavor. Use about 3/4 cup of honey in place of granulated sugar. Just remember to reduce the lemon juice slightly to maintain the right consistency.
- Maple Syrup: This sweet syrup brings a warm, earthy flavor. Substitute 3/4 cup of maple syrup for the granulated sugar. Again, adjust the lemon juice to keep the filling balanced.
- Stevia: A low-calorie sweetener that’s much sweeter than sugar. Use a stevia conversion chart to find the right amount, as it varies by brand.
These alternatives not only change the sweetness but can also add a new depth of flavor to your lemon bars. Experiment with different sweeteners to find your favorite combination!
Adding Flavor Variations
Want to give your lemon bars a twist? Here are some fun flavor variations to consider:
- Berries: Fold in 1/2 cup of fresh raspberries or blueberries into the lemon filling before baking. The berries will add a pop of color and a burst of flavor.
- Coconut: For a tropical twist, mix in 1/4 cup of shredded coconut into the crust or filling. This will enhance the coconut flavor from the coconut flour.
- Herbs: Add a hint of freshness by incorporating finely chopped mint or basil into the filling. This unexpected addition can create a refreshing taste.
- Ginger: Grate a small piece of fresh ginger into the lemon filling for a spicy kick. This pairs beautifully with the tartness of the lemon.
These variations allow you to customize your Gluten Free Lemon Bars to suit your taste preferences. Feel free to mix and match these ideas to create a unique dessert that everyone will love!
Cooking Note for Gluten Free Lemon Bars Recipe
When it comes to baking gluten-free treats, a few key tips can make all the difference. Here are some important cooking notes to keep in mind while preparing your Gluten Free Lemon Bars:
- Ingredient Quality: Always use high-quality ingredients. Fresh lemons are essential for the best flavor. Opt for organic lemons if possible, as they tend to have a more vibrant taste.
- Measuring Flours: When measuring almond and coconut flour, use the spoon-and-level method. This means spooning the flour into your measuring cup and leveling it off with a knife. This helps avoid packing the flour, which can lead to a denser crust.
- Room Temperature Eggs: For the best results, use eggs that are at room temperature. This helps them mix more easily into the filling, creating a smoother texture.
- Cooling Time: Don’t rush the cooling process! Allowing the bars to cool completely at room temperature before refrigerating is crucial. This helps the filling set properly, ensuring a perfect slice.
- Oven Calibration: Every oven is different. If you find that your bars are browning too quickly or not cooking evenly, consider using an oven thermometer to check the temperature. Adjust your baking time as needed.
By following these cooking notes, you’ll set yourself up for success in creating delicious Gluten Free Lemon Bars. Happy baking!
Serving Suggestions for Gluten Free Lemon Bars Recipe
Once your Gluten Free Lemon Bars are ready, it’s time to think about how to serve them! These bars are not only delicious but also versatile. Here are some great serving suggestions to enhance your dessert experience.
Pairing with Beverages
Choosing the right beverage can elevate your lemon bars to a whole new level. Here are some delightful pairings:
- Iced Tea: A refreshing glass of iced tea complements the tartness of the lemon bars beautifully. Consider sweetening it lightly with honey or adding a slice of lemon for extra zing.
- Lemonade: For a double dose of lemon, serve your bars with a chilled glass of lemonade. This pairing is perfect for summer gatherings!
- Coffee: The rich flavor of coffee balances the sweetness of the lemon bars. A light roast or even a creamy latte can be a delightful match.
- Sparkling Water: For a lighter option, serve your lemon bars with sparkling water. Add a few mint leaves or slices of cucumber for a refreshing twist.
These beverage pairings not only enhance the flavors of your dessert but also create a delightful dining experience for you and your guests.
Presentation Ideas
Presentation is key when serving your Gluten Free Lemon Bars. Here are some creative ideas to make your dessert look as good as it tastes:
- Dusting with Powdered Sugar: A light dusting of powdered sugar adds a touch of elegance. Use a fine sieve to create a beautiful pattern on top of the bars.
- Garnishing with Lemon Slices: Place a thin slice of lemon on each bar for a pop of color. This not only looks appealing but also hints at the zesty flavor inside.
- Serving on a Colorful Plate: Use a vibrant plate or platter to serve your lemon bars. The contrast between the bright yellow bars and the plate will make your dessert stand out.
- Adding Fresh Berries: Scatter some fresh berries around the bars on the serving platter. This adds color and a burst of flavor that pairs well with the lemon.
With these serving suggestions, your Gluten Free Lemon Bars will not only taste amazing but also look stunning on the table. Enjoy sharing this delightful treat with family and friends!
Tips for Perfecting Your Gluten Free Lemon Bars Recipe
Creating the perfect Gluten Free Lemon Bars is all about attention to detail. With a few helpful tips, you can avoid common pitfalls and ensure your bars turn out delicious every time. Let’s explore some common mistakes to avoid and storage tips to keep your lemon bars fresh.
Common Mistakes to Avoid
Even the best bakers can make mistakes. Here are some common errors to watch out for:
- Overmixing the Filling: When making the lemon filling, mix just until combined. Overmixing can introduce too much air, leading to a puffy texture that may collapse as it cools.
- Not Pre-baking the Crust: Skipping the pre-baking step can result in a soggy crust. Always bake the crust until it’s lightly golden to create a sturdy base for the filling.
- Using Cold Ingredients: Cold eggs or butter can affect the texture of your filling. Always use room temperature ingredients for the best results.
- Not Letting Them Cool: Patience is key! Allow your lemon bars to cool completely before cutting. This helps the filling set properly and makes for cleaner slices.
- Ignoring Oven Temperature: Every oven is different. If your bars are browning too quickly, consider lowering the temperature slightly. An oven thermometer can help ensure accuracy.
Storage Tips
To keep your Gluten Free Lemon Bars fresh and delicious, follow these storage tips:
- Refrigeration: Store your lemon bars in an airtight container in the refrigerator. They can last up to a week, but they’re best enjoyed within the first few days.
- Freezing: If you want to save some for later, lemon bars freeze well. Wrap them tightly in plastic wrap and then place them in a freezer-safe container. They can be frozen for up to three months.
- Thawing: To enjoy frozen lemon bars, simply transfer them to the refrigerator to thaw overnight. This helps maintain their texture and flavor.
- Serving After Storage: If you’ve stored your bars in the fridge, let them sit at room temperature for a few minutes before serving. This enhances the flavor and makes them more enjoyable.
By avoiding common mistakes and following these storage tips, you’ll be well on your way to perfecting your Gluten Free Lemon Bars Recipe. Happy baking!
Breakdown of Time for Gluten Free Lemon Bars Recipe
Understanding the time required for each step in the Gluten Free Lemon Bars Recipe can help you plan your baking session effectively. Here’s a detailed breakdown of the time you’ll need for preparation and cooking.
Prep Time
The prep time for your Gluten Free Lemon Bars is approximately 15-20 minutes. This includes gathering your ingredients, measuring them out, and mixing the crust and filling. Make sure to have everything ready before you start, as this will make the process smoother and more enjoyable.
Cooking Time
The cooking time consists of two parts: baking the crust and baking the filling. The crust will take about 15 minutes to bake until it’s lightly golden. After adding the lemon filling, you’ll need to bake the bars for an additional 20-25 minutes. In total, the cooking time is around 35-40 minutes.
Total Time
When you combine the prep time and cooking time, the total time for making your Gluten Free Lemon Bars is approximately 50-60 minutes. However, don’t forget to factor in the cooling and chilling time! After baking, it’s essential to let the bars cool completely at room temperature and then refrigerate them for at least 2 hours. This means that while the active time is under an hour, the total time from start to finish will be about 2 hours and 50 minutes.
By keeping track of these time estimates, you can ensure that your baking experience is organized and enjoyable. Now that you know how long it takes, you’re one step closer to enjoying your delicious Gluten Free Lemon Bars!
Nutritional Information for Gluten Free Lemon Bars Recipe
Understanding the nutritional content of your Gluten Free Lemon Bars is essential, especially if you’re mindful of your diet. These bars are not only delicious but also provide a satisfying treat without gluten. Here’s a breakdown of the key nutritional components per serving:
Calories
Each serving of these delightful Gluten Free Lemon Bars contains approximately 180 calories. This makes them a great option for a sweet treat that won’t derail your dietary goals. The combination of almond and coconut flour contributes to the calorie count while providing healthy fats and fiber.
Protein
In terms of protein, each bar offers about 4 grams. The protein comes primarily from the eggs and almond flour, making these bars a more nutritious choice compared to traditional lemon bars. This protein content can help keep you feeling full and satisfied after enjoying a piece.
Sodium
When it comes to sodium, each serving contains roughly 50 milligrams. This is relatively low, making these lemon bars a heart-healthy dessert option. The use of unsalted butter helps keep the sodium levels in check, allowing you to indulge without worry.
Overall, these Gluten Free Lemon Bars provide a balanced treat that fits well into a variety of dietary plans. With their refreshing flavor and satisfying texture, they are sure to be a hit with everyone, regardless of their dietary needs!
FAQs about Gluten Free Lemon Bars Recipe
Can I use regular flour instead of gluten-free flour?
Using regular flour in this Gluten Free Lemon Bars Recipe is not recommended. The recipe relies on almond flour and coconut flour to create a gluten-free crust that is both delicious and satisfying. Regular flour contains gluten, which would change the texture and structure of the bars. If you’re looking for a gluten-free option, stick with the specified flours for the best results!
How do I know when the lemon bars are done baking?
Knowing when your lemon bars are done baking is key to achieving the perfect texture. You’ll want to look for a few signs: the edges should be lightly golden, and the filling should be set but still slightly jiggly in the center. A toothpick inserted into the filling should come out clean or with just a few moist crumbs. If you see any wet batter, give them a few more minutes in the oven. Remember, they will continue to firm up as they cool!
Can I freeze gluten free lemon bars?
Absolutely! Freezing gluten-free lemon bars is a great way to enjoy them later. To freeze, wrap the bars tightly in plastic wrap and then place them in a freezer-safe container. They can be stored in the freezer for up to three months. When you’re ready to enjoy them, simply transfer them to the refrigerator to thaw overnight. This method helps maintain their flavor and texture, so you can savor them just like fresh!
What can I substitute for eggs in this recipe?
If you need an egg substitute for this Gluten Free Lemon Bars Recipe, there are several options you can try. One common substitute is to use flaxseed meal. Mix 1 tablespoon of flaxseed meal with 2.5 tablespoons of water and let it sit for about 5 minutes until it thickens. This mixture can replace one egg. Another option is unsweetened applesauce; use 1/4 cup of applesauce for each egg. These substitutes will help bind the ingredients together while keeping your bars deliciously moist!
Conclusion on Gluten Free Lemon Bars Recipe
In conclusion, the Gluten Free Lemon Bars Recipe is a delightful treat that brings together the perfect balance of sweetness and tartness. With its unique crust made from almond and coconut flour, this recipe not only caters to those with gluten sensitivities but also offers a delicious dessert option for everyone. The bright, zesty flavor of fresh lemons shines through, making each bite a refreshing experience.
Whether you’re baking for a special occasion or simply craving something sweet, these lemon bars are sure to impress. They are easy to prepare and can be customized with various sweeteners and flavor variations, allowing you to make them your own. Plus, with the tips and serving suggestions provided, you can elevate your dessert presentation and pairing options.
So, gather your ingredients and get ready to enjoy a batch of these scrumptious Gluten Free Lemon Bars. They are perfect for sharing with family and friends or savoring all on your own. Happy baking, and may your kitchen be filled with the delightful aroma of lemony goodness!
Gluten Free Lemon Bars
Ingredients
Equipment
Method
- Preheat the oven to 350°F (175°C).
- In a medium bowl, combine almond flour, coconut flour, powdered sugar, melted butter, and salt. Mix until crumbly.
- Press the crust mixture into the bottom of an 8×8-inch baking dish.
- Bake the crust for 15 minutes until lightly golden.
- In a large bowl, whisk the eggs until beaten. Add granulated sugar, fresh lemon juice, lemon zest, and baking powder. Mix until smooth.
- Pour the lemon filling over the baked crust and spread evenly.
- Bake for an additional 20-25 minutes until the filling is set and edges are lightly golden.
- Let the bars cool completely at room temperature, then refrigerate for at least 120 minutes before serving.
- Cut into squares and dust with powdered sugar before serving.