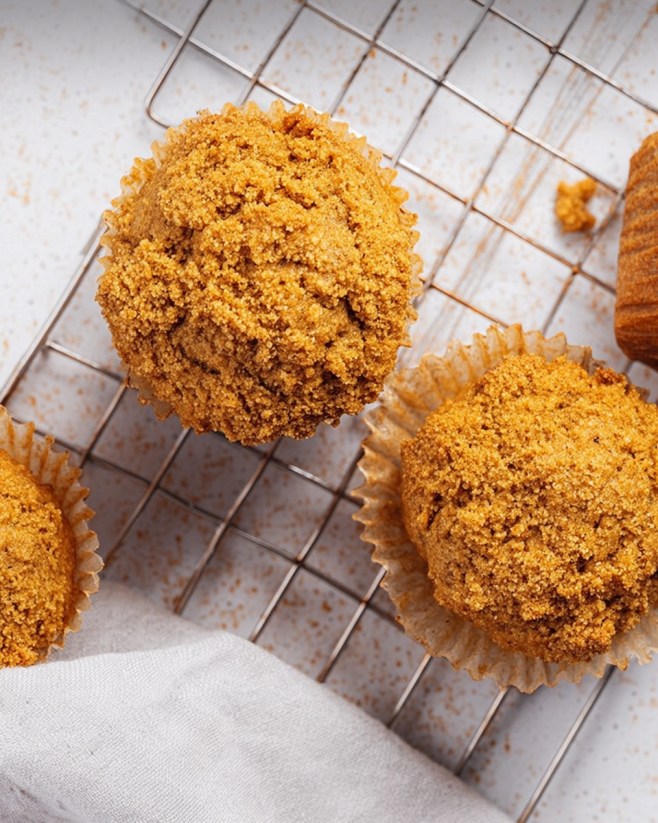
Introduction to Gluten Free Bran Muffins Recipe
Welcome to the delightful world of gluten-free baking! If you’re looking for a tasty and healthy treat, gluten-free bran muffins are a fantastic choice. These muffins are not only easy to make, but they also pack a nutritious punch. With a combination of gluten-free oat bran and almond flour, they provide a wonderful texture and flavor that everyone will love.
Whether you’re gluten intolerant or simply seeking a healthier option, this gluten-free bran muffins recipe is perfect for breakfast or a snack. They are moist, fluffy, and can be customized to suit your taste. You can add fruits, nuts, or even chocolate chips to make them your own!
In this article, we will guide you through the ingredients, preparation steps, and variations of this delicious recipe. You’ll also find helpful tips to ensure your muffins turn out perfectly every time. So, let’s dive into the wonderful world of gluten-free bran muffins and discover how easy it is to whip up a batch!
Ingredients for Gluten Free Bran Muffins Recipe
To create these scrumptious gluten-free bran muffins, you’ll need a few simple ingredients. Each component plays a vital role in achieving the perfect texture and flavor. Here’s what you’ll need:
- 1 cup gluten-free oat bran: This is the star ingredient, providing fiber and a hearty texture.
- 1 cup almond flour: A great gluten-free alternative that adds moisture and a nutty flavor.
- 1/2 cup brown sugar: This sweetener gives the muffins a rich taste and helps keep them moist.
- 1 teaspoon baking powder: This leavening agent helps the muffins rise and become fluffy.
- 1/2 teaspoon baking soda: Works alongside baking powder to ensure a light texture.
- 1/2 teaspoon salt: Enhances the flavors of the other ingredients.
- 1 teaspoon cinnamon: Adds a warm, comforting spice that complements the sweetness.
- 1/2 cup unsweetened applesauce: Acts as a natural sweetener and keeps the muffins moist.
- 1/2 cup milk: You can use either dairy or non-dairy milk, depending on your preference.
- 2 large eggs: These provide structure and help bind the ingredients together.
- 1 teaspoon vanilla extract: Adds a lovely aroma and flavor to the muffins.
- 1/2 cup raisins or chopped nuts (optional): These can be added for extra texture and flavor.
Gather these ingredients, and you’ll be well on your way to baking delicious gluten-free bran muffins. Each item contributes to the overall taste and health benefits of this delightful recipe. Now, let’s move on to the preparation steps!
Preparation of Gluten Free Bran Muffins Recipe
Now that you have all your ingredients ready, it’s time to start preparing your gluten-free bran muffins. Follow these simple steps to create a batch of delicious muffins that everyone will enjoy. Let’s get started!
Step 1: Preheat the Oven
First things first, preheat your oven to 350°F (175°C). This step is crucial as it ensures that your muffins bake evenly. A hot oven helps them rise beautifully, giving you that perfect fluffy texture.
Step 2: Prepare the Muffin Tin
While the oven is heating up, prepare your muffin tin. You can line it with paper liners for easy removal or lightly grease it with cooking spray. This will prevent the muffins from sticking and make cleanup a breeze!
Step 3: Mix Dry Ingredients
In a large mixing bowl, combine the gluten-free oat bran, almond flour, brown sugar, baking powder, baking soda, salt, and cinnamon. Use a whisk or a fork to mix these dry ingredients well. This step ensures that the leavening agents are evenly distributed, which is key for fluffy muffins.
Step 4: Combine Wet Ingredients
In a separate bowl, whisk together the unsweetened applesauce, milk, eggs, and vanilla extract until smooth. Mixing these wet ingredients thoroughly will help create a uniform batter, making your muffins light and airy.
Step 5: Blend Wet and Dry Mixtures
Now, pour the wet ingredients into the bowl with the dry ingredients. Stir gently until just combined. Be careful not to overmix, as this can lead to dense muffins. If you’re adding raisins or nuts, fold them in at this stage for an extra burst of flavor!
Step 6: Fill Muffin Tins
Using a spoon or a scoop, divide the batter evenly among the prepared muffin cups. Fill each cup about two-thirds full. This allows room for the muffins to rise without overflowing.
Step 7: Bake the Muffins
Finally, place the muffin tin in the preheated oven and bake for 18-20 minutes. To check for doneness, insert a toothpick into the center of a muffin. If it comes out clean, your muffins are ready! Once baked, allow them to cool in the pan for about 5 minutes before transferring them to a wire rack.
And there you have it! Your gluten-free bran muffins are now ready to be enjoyed. They make a perfect breakfast or snack option, and you can customize them to your liking. Let’s explore some fun variations next!
Variation of Gluten Free Bran Muffins Recipe
One of the best things about gluten-free bran muffins is their versatility. You can easily customize them to suit your taste preferences. Let’s explore some exciting variations that can elevate your gluten-free bran muffins to the next level!
Adding Fruits and Nuts
Fruits and nuts can add delightful flavors and textures to your muffins. Here are some ideas:
- Bananas: Mashed ripe bananas can replace some of the applesauce. They add natural sweetness and moisture.
- Berries: Fresh or frozen blueberries, raspberries, or chopped strawberries can be folded into the batter for a fruity twist.
- Chopped Nuts: Walnuts, pecans, or almonds can add a satisfying crunch. Just be sure to chop them into smaller pieces for even distribution.
- Dried Fruits: Consider adding dried cranberries, apricots, or figs for a chewy texture and a burst of flavor.
Feel free to mix and match these options to create your perfect muffin. The addition of fruits and nuts not only enhances the taste but also boosts the nutritional value of your gluten-free bran muffins.
Alternative Sweeteners
If you’re looking to reduce sugar or try something different, there are several alternative sweeteners you can use:
- Honey or Maple Syrup: These natural sweeteners can replace brown sugar. Use about 1/3 cup of honey or syrup for every 1/2 cup of brown sugar.
- Coconut Sugar: This is a great one-to-one substitute for brown sugar. It has a lower glycemic index and adds a caramel-like flavor.
- Stevia or Monk Fruit Sweetener: If you want to cut calories, these zero-calorie sweeteners can be used. Check the packaging for conversion ratios, as they are much sweeter than sugar.
Experimenting with different sweeteners can lead to unique flavors in your gluten-free bran muffins. Just remember to adjust the liquid ingredients if you’re using a liquid sweetener.
With these variations, you can create a new batch of gluten-free bran muffins every time you bake. Let your creativity shine and enjoy the delicious results!
Cooking Note for Gluten Free Bran Muffins Recipe
When baking gluten-free bran muffins, there are a few important cooking notes to keep in mind. These tips will help ensure that your muffins turn out perfectly every time. First, always check the freshness of your baking powder and baking soda. Expired leavening agents can lead to dense muffins that don’t rise properly.
Additionally, consider the temperature of your ingredients. Using room temperature eggs and milk can help create a smoother batter. This, in turn, leads to a better texture in your muffins. If you have time, let your eggs and milk sit out for about 30 minutes before mixing.
Another key point is to avoid overmixing the batter. Stir just until the ingredients are combined. Overmixing can develop the gluten in the flour, which is not ideal for gluten-free baking. This can result in tough muffins instead of the light and fluffy texture you desire.
Lastly, keep an eye on your muffins as they bake. Ovens can vary in temperature, so start checking for doneness a few minutes before the recommended baking time. This way, you can catch them at the perfect moment, ensuring they are moist and delicious.
By following these cooking notes, you’ll be well on your way to baking scrumptious gluten-free bran muffins that everyone will love!
Serving Suggestions for Gluten Free Bran Muffins Recipe
Once your gluten-free bran muffins are baked and cooled, it’s time to enjoy them! These muffins are incredibly versatile and can be served in various ways. Here are some delightful serving suggestions:
- With Butter or Nut Butter: Spread a little butter or your favorite nut butter on a warm muffin for a delicious treat. Almond or peanut butter pairs wonderfully with the flavors of the muffins.
- With Jam or Honey: A dollop of fruit jam or a drizzle of honey can add a sweet touch. This is especially nice if you’ve opted for less sugar in your muffins.
- As a Breakfast Option: Serve the muffins alongside yogurt and fresh fruit for a balanced breakfast. This combination provides protein, fiber, and essential nutrients.
- As a Snack: Enjoy them as a mid-afternoon snack. They are perfect for on-the-go munching and can be packed in lunchboxes for a healthy treat.
These serving suggestions can enhance your gluten-free bran muffins experience. Feel free to mix and match to find your favorite way to enjoy them!
Cooking Note for Gluten Free Bran Muffins Recipe
When baking gluten-free bran muffins, there are a few important cooking notes to keep in mind. These tips will help ensure that your muffins turn out perfectly every time. First, always check the freshness of your baking powder and baking soda. Expired leavening agents can lead to dense muffins that don’t rise properly.
Additionally, consider the temperature of your ingredients. Using room temperature eggs and milk can help create a smoother batter. This, in turn, leads to a better texture in your muffins. If you have time, let your eggs and milk sit out for about 30 minutes before mixing.
Another key point is to avoid overmixing the batter. Stir just until the ingredients are combined. Overmixing can develop the gluten in the flour, which is not ideal for gluten-free baking. This can result in tough muffins instead of the light and fluffy texture you desire.
Lastly, keep an eye on your muffins as they bake. Ovens can vary in temperature, so start checking for doneness a few minutes before the recommended baking time. This way, you can catch them at the perfect moment, ensuring they are moist and delicious.
By following these cooking notes, you’ll be well on your way to baking scrumptious gluten-free bran muffins that everyone will love!
Serving Suggestions for Gluten Free Bran Muffins Recipe
Once your gluten-free bran muffins are baked and cooled, it’s time to enjoy them! These muffins are incredibly versatile and can be served in various ways. Here are some delightful serving suggestions:
- With Butter or Nut Butter: Spread a little butter or your favorite nut butter on a warm muffin for a delicious treat. Almond or peanut butter pairs wonderfully with the flavors of the muffins.
- With Jam or Honey: A dollop of fruit jam or a drizzle of honey can add a sweet touch. This is especially nice if you’ve opted for less sugar in your muffins.
- As a Breakfast Option: Serve the muffins alongside yogurt and fresh fruit for a balanced breakfast. This combination provides protein, fiber, and essential nutrients.
- As a Snack: Enjoy them as a mid-afternoon snack. They are perfect for on-the-go munching and can be packed in lunchboxes for a healthy treat.
- With a Hot Beverage: Pair your muffins with a cup of tea or coffee. The warmth of the drink complements the muffins beautifully, making for a cozy snack time.
These serving suggestions can enhance your gluten-free bran muffins experience. Feel free to mix and match to find your favorite way to enjoy them! Whether you’re having them for breakfast, a snack, or dessert, these muffins are sure to satisfy your cravings.
Tips for Perfect Gluten Free Bran Muffins Recipe
To achieve the best results with your gluten-free bran muffins, consider these helpful tips. They will guide you in creating muffins that are not only delicious but also have the perfect texture and flavor.
- Measure Ingredients Accurately: Use a kitchen scale or measuring cups to ensure you have the right amounts. Accurate measurements are crucial in baking, especially with gluten-free recipes.
- Use Fresh Ingredients: Always check the expiration dates on your baking powder, baking soda, and other ingredients. Fresh ingredients will help your muffins rise properly and taste their best.
- Don’t Overmix: When combining wet and dry ingredients, mix just until combined. Overmixing can lead to dense muffins. A few lumps are okay!
- Let the Batter Rest: Allowing the batter to sit for about 10 minutes before baking can help the oat bran absorb moisture. This can lead to a softer muffin.
- Experiment with Add-ins: Feel free to try different fruits, nuts, or spices. Adding a teaspoon of nutmeg or a handful of chocolate chips can create exciting flavor variations.
- Check for Doneness: Use a toothpick to test if the muffins are done. If it comes out clean or with a few crumbs, they are ready. Avoid opening the oven door too often, as this can affect baking time.
- Cool Properly: After baking, let the muffins cool in the pan for a few minutes before transferring them to a wire rack. This helps them set and prevents sogginess.
- Store Correctly: Keep your muffins in an airtight container at room temperature for up to three days. For longer storage, freeze them in a zip-top bag. Just thaw them at room temperature when you’re ready to enjoy!
By following these tips, you’ll be well on your way to baking perfect gluten-free bran muffins every time. Enjoy the process and the delicious results!
Breakdown of Time for Gluten Free Bran Muffins Recipe
Prep Time
The prep time for gluten-free bran muffins is quite manageable. You’ll need about 15 minutes to gather your ingredients and mix everything together. This includes measuring out the dry and wet ingredients, as well as preparing your muffin tin. With a little organization, you can have everything ready to go in no time!
Cooking Time
Once your batter is ready, the cooking time is straightforward. Bake the muffins in your preheated oven for 18-20 minutes. Keep an eye on them as they bake, and use a toothpick to check for doneness. If it comes out clean, your muffins are perfectly baked!
Total Time
In total, you can expect to spend about 35-40 minutes from start to finish. This includes both the prep and cooking times. With such a quick turnaround, you can enjoy fresh gluten-free bran muffins in no time. Perfect for a busy morning or a delightful snack!
Nutritional Information for Gluten Free Bran Muffins Recipe
Understanding the nutritional content of your gluten-free bran muffins is essential for making informed choices. These muffins are not only delicious but also provide a good balance of nutrients. Here’s a breakdown of the key nutritional information per serving:
Calories
Each gluten-free bran muffin contains approximately 150 calories. This makes them a satisfying option for breakfast or a snack without overloading on calories. They provide energy to keep you going throughout the day!
Protein
These muffins offer about 4 grams of protein per serving. Protein is vital for building and repairing tissues, and it helps keep you feeling full longer. Including protein in your diet can support overall health and wellness.
Sodium
Each muffin contains around 200 milligrams of sodium. This amount is relatively low, making these muffins a heart-healthy choice. Keeping sodium intake in check is important for maintaining healthy blood pressure levels.
In addition to these key nutrients, gluten-free bran muffins are rich in fiber, thanks to the oat bran. Fiber is essential for digestive health and can help regulate blood sugar levels. Overall, these muffins are a nutritious option that can fit well into a balanced diet.
FAQs about Gluten Free Bran Muffins Recipe
Can I use regular flour instead of gluten-free flour?
Using regular flour in this gluten-free bran muffins recipe is not recommended. The recipe is specifically designed to be gluten-free, utilizing gluten-free oat bran and almond flour. Regular flour contains gluten, which can affect the texture and rise of the muffins. If you need a gluten-free option, stick with the ingredients listed for the best results.
How can I make these muffins vegan?
Making these gluten-free bran muffins vegan is quite simple! You can replace the two large eggs with flax eggs. To make a flax egg, mix 1 tablespoon of ground flaxseed with 2.5 tablespoons of water. Let it sit for about 5 minutes until it thickens. Additionally, use a non-dairy milk, such as almond or oat milk, to keep the recipe vegan-friendly. These substitutions will maintain the muffins’ delicious flavor and texture.
What can I substitute for bran in this recipe?
If you don’t have oat bran on hand, you can substitute it with other gluten-free options. Ground flaxseed or chia seeds can work well, providing similar fiber content. Alternatively, you can use gluten-free all-purpose flour, but keep in mind that this may alter the texture slightly. Adjust the liquid ingredients as needed to achieve the right consistency.
How do I store leftover muffins?
To store leftover gluten-free bran muffins, place them in an airtight container at room temperature. They will stay fresh for up to three days. If you want to keep them longer, consider freezing them. Wrap each muffin individually in plastic wrap and place them in a zip-top bag. They can be frozen for up to three months. When you’re ready to enjoy them, simply thaw at room temperature or warm them in the microwave for a few seconds.
Conclusion on Gluten Free Bran Muffins Recipe
In conclusion, gluten-free bran muffins are a delightful and nutritious option for anyone looking to enjoy a tasty treat without gluten. This recipe is not only simple to follow but also allows for plenty of customization. Whether you prefer them with fruits, nuts, or alternative sweeteners, the possibilities are endless!
These muffins are perfect for breakfast, snacks, or even dessert. They provide a good balance of fiber, protein, and essential nutrients, making them a wholesome choice for your diet. Plus, with their moist texture and delicious flavor, they are sure to please everyone, regardless of dietary restrictions.
As you embark on your baking journey, remember the tips and variations shared in this article. They will help you create the perfect batch of gluten-free bran muffins every time. So, gather your ingredients, preheat your oven, and get ready to enjoy a warm, homemade treat that’s both satisfying and good for you!
Happy baking, and may your gluten-free bran muffins bring joy to your table and smiles to your loved ones!
Gluten Free Bran Muffins
Ingredients
Equipment
Method
- Preheat your oven to 350°F.
- Prepare your muffin tin with liners or grease it.
- Mix dry ingredients in a large bowl.
- Whisk wet ingredients in a separate bowl until smooth.
- Combine wet and dry mixtures, stir gently.
- Fill muffin tins about two-thirds full.
- Bake for 18-20 minutes, check for doneness with a toothpick.
- Cool in the pan for 5 minutes before transferring to a wire rack.