Introduction to the Crispy Gluten-Free Pizzelle Recipe
What are Pizzelles?
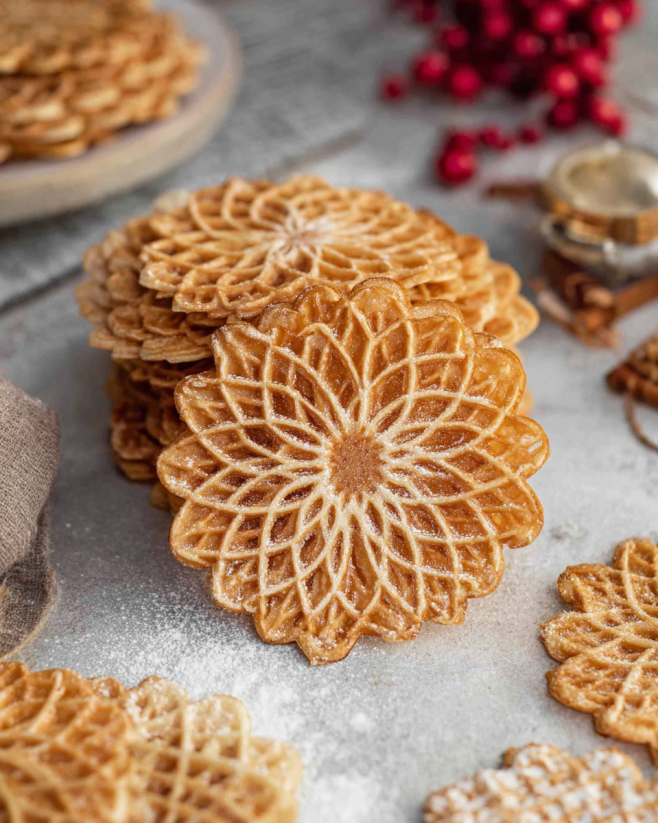
Pizzelles are traditional Italian cookies that are thin, crisp, and often beautifully patterned. They are made using a special iron that creates intricate designs, making them not only delicious but also visually appealing. Typically, pizzelles are flavored with vanilla or anise, giving them a unique taste that pairs wonderfully with coffee or tea. These delightful treats are perfect for any occasion, from holiday gatherings to casual snacks. Their light texture and delightful crunch make them a favorite among cookie lovers everywhere.
Why Choose a Gluten-Free Version?
Choosing a gluten-free version of pizzelles opens up this delightful treat to those with gluten sensitivities or celiac disease. Gluten-free diets are becoming more popular, and many people are looking for tasty alternatives to traditional recipes. This crispy gluten-free pizzelle recipe allows everyone to enjoy the classic flavors without compromising their dietary needs. Plus, gluten-free flours can add a unique taste and texture, making these pizzelles just as enjoyable as their traditional counterparts. Whether you’re gluten-free by choice or necessity, this recipe ensures that no one misses out on the joy of homemade pizzelles!
Ingredients for the Crispy Gluten-Free Pizzelle Recipe
To create your own batch of crispy gluten-free pizzelles, you’ll need a few simple ingredients. Each component plays a vital role in achieving that perfect texture and flavor. Here’s what you’ll need:
- 1 cup gluten-free all-purpose flour: This is the base of your pizzelle. Make sure to choose a blend that includes xanthan gum for the best results.
- 1 teaspoon baking powder: This helps the pizzelles rise slightly, giving them a light and airy texture.
- 1/4 teaspoon salt: A pinch of salt enhances the flavors and balances the sweetness.
- 3 large eggs: Eggs provide structure and moisture, making the pizzelles rich and delicious.
- 3/4 cup granulated sugar: This sweetens the batter and contributes to the crispiness of the pizzelles.
- 1/2 cup melted butter (cooled): Butter adds richness and flavor, making the pizzelles taste delightful.
- 1 teaspoon vanilla extract: This classic flavor pairs beautifully with the other ingredients.
- 1 teaspoon anise extract (optional): For those who enjoy a hint of licorice flavor, this ingredient is a lovely addition.
- Powdered sugar for dusting (optional): A light dusting of powdered sugar adds a touch of sweetness and makes the pizzelles look elegant.
Gather these ingredients before you start cooking. Having everything ready will make the process smoother and more enjoyable. Now that you have your ingredients, you’re one step closer to making delicious crispy gluten-free pizzelles!
Step-by-Step Preparation of the Crispy Gluten-Free Pizzelle Recipe
Step 1: Gather Your Ingredients
Before diving into the cooking process, it’s essential to gather all your ingredients. This step ensures you have everything at hand, making the preparation smooth and efficient. Check your pantry for gluten-free flour, baking powder, salt, eggs, sugar, melted butter, and extracts. Don’t forget the optional powdered sugar for dusting! Having everything ready will help you focus on creating those delicious pizzelles without any interruptions.
Step 2: Prepare the Batter
Now, let’s get to the fun part—making the batter! In a medium bowl, whisk together the gluten-free flour, baking powder, and salt. This mixture is the foundation of your pizzelles. In a separate large mixing bowl, beat the eggs and granulated sugar together. You want this mixture to become light and fluffy, which usually takes about 3-5 minutes. Once it’s airy, gradually add the cooled melted butter, vanilla extract, and anise extract if you’re using it. Mix until everything is well combined. Finally, slowly add the dry ingredients to the wet mixture, stirring gently until just combined. The batter will be thick, but that’s perfect for pizzelles!
Step 3: Preheat the Pizzelle Maker
While your batter is resting, it’s time to preheat your pizzelle maker. Follow the manufacturer’s instructions for the best results. If you don’t have a pizzelle maker, a waffle iron can work as an alternative, though the texture may differ slightly. Preheating is crucial as it ensures that your pizzelles cook evenly and achieve that delightful crispiness. A hot maker will also help create those beautiful patterns that pizzelles are known for!
Step 4: Cook the Pizzelles
Once your pizzelle maker is ready, it’s time to cook! Lightly grease the plates with cooking spray or a small amount of melted butter to prevent sticking. Drop about 1 tablespoon of batter onto the center of each pizzelle mold. Close the lid and let them cook for about 30-60 seconds. Keep an eye on them; you want them to turn golden brown. The cooking time may vary depending on your pizzelle maker, so adjust as needed. Once they’re ready, carefully remove the pizzelles and place them on a wire rack to cool.
Step 5: Cool and Store the Pizzelles
After cooking, it’s important to let the pizzelles cool completely on a wire rack. This cooling process helps them maintain their crispiness. If you’d like, you can dust them with powdered sugar for an extra touch of sweetness and elegance. Once cooled, store any leftovers in an airtight container. They can last for several days, but trust us, they won’t last long! Enjoy your homemade crispy gluten-free pizzelles with a cup of coffee or tea, and share them with friends and family for a delightful treat!
Variations of the Crispy Gluten-Free Pizzelle Recipe
Flavor Variations
One of the best things about the crispy gluten-free pizzelle recipe is its versatility. You can easily customize the flavor to suit your taste buds. Here are some delightful variations to consider:
- Chocolate Pizzelles: For a rich twist, add 2 tablespoons of cocoa powder to the dry ingredients. This will give your pizzelles a delicious chocolate flavor that pairs wonderfully with coffee.
- Citrus Pizzelles: Swap out the vanilla extract for lemon or orange extract. This will infuse your pizzelles with a refreshing citrus zing, perfect for springtime gatherings.
- Spiced Pizzelles: Add a pinch of cinnamon or nutmeg to the batter for a warm, spiced flavor. This variation is especially delightful during the fall and winter months.
- Nutty Pizzelles: Incorporate finely chopped nuts, such as almonds or hazelnuts, into the batter. This adds a lovely crunch and nutty flavor to your pizzelles.
Feel free to experiment with different extracts and spices to create your own unique pizzelle flavors. The possibilities are endless, and each variation brings a new twist to this classic treat!
Serving Variations
How you serve your crispy gluten-free pizzelles can also enhance the experience. Here are some fun serving ideas:
- With Dipping Sauces: Serve your pizzelles with a side of melted chocolate, caramel sauce, or fruit preserves for dipping. This adds an interactive element to your dessert.
- As Ice Cream Sandwiches: Place a scoop of your favorite ice cream between two pizzelles for a delightful dessert sandwich. This is a fun treat for warm days!
- With Fresh Fruit: Top your pizzelles with fresh berries or sliced fruit. A dollop of whipped cream or yogurt can make this a refreshing dessert.
- As a Dessert Platter: Arrange your pizzelles on a platter with other desserts, like cookies or brownies. This makes for an impressive dessert spread at parties.
These serving variations not only enhance the pizzelle experience but also allow you to get creative in the kitchen. Enjoy trying out different combinations and sharing them with friends and family!
Cooking Note for the Crispy Gluten-Free Pizzelle Recipe
When making crispy gluten-free pizzelles, a few cooking notes can help ensure your success. First, always check the settings on your pizzelle maker. Different models may require slight adjustments in cooking time or temperature. If you’re using a waffle iron, remember that the cooking time may vary, so keep an eye on your pizzelles to avoid overcooking.
Another important tip is to allow the batter to rest for a few minutes before cooking. This resting period can help the gluten-free flour absorb moisture, leading to a better texture. If your batter seems too thick, you can add a teaspoon of milk or water to loosen it slightly.
Additionally, greasing the pizzelle maker is crucial. Even if it’s non-stick, a light coating of cooking spray or melted butter can prevent sticking and make it easier to remove the pizzelles. If you notice that the pizzelles are sticking, try adjusting the amount of grease you use or check the temperature of your maker.
Lastly, remember that pizzelles are best enjoyed fresh. While they can be stored, their crispiness may diminish over time. If you want to revive them, simply pop them in a toaster oven for a few minutes to restore their delightful crunch. With these cooking notes in mind, you’re all set to create perfect crispy gluten-free pizzelles every time!
Serving Suggestions for the Crispy Gluten-Free Pizzelle Recipe
Once you’ve made your crispy gluten-free pizzelles, it’s time to think about how to serve them. These delightful treats can be enjoyed in many ways, making them perfect for any occasion. Here are some serving suggestions to elevate your pizzelle experience:
- Classic Pairing: Serve your pizzelles alongside a steaming cup of coffee or tea. The light, crispy texture complements the warmth of your beverage, creating a delightful snack.
- With Fresh Berries: Top your pizzelles with a mix of fresh berries, such as strawberries, blueberries, or raspberries. A drizzle of honey or a sprinkle of powdered sugar can add a touch of sweetness.
- Ice Cream Delight: Create a delicious dessert by sandwiching a scoop of your favorite ice cream between two pizzelles. This combination is especially refreshing on warm days!
- Fruit Compote: Serve your pizzelles with a warm fruit compote made from apples, peaches, or cherries. This adds a fruity twist and makes for a comforting dessert.
- Chocolate Drizzle: Melt some chocolate and drizzle it over the pizzelles for a decadent treat. You can also dip them in chocolate for an extra indulgent experience.
- Cheese and Honey: For a savory option, pair pizzelles with a soft cheese like mascarpone or ricotta, and drizzle with honey. This sweet and savory combination is sure to impress your guests.
- As a Dessert Platter: Arrange your pizzelles on a platter with other desserts, such as cookies, brownies, or mini pastries. This makes for an impressive dessert spread at parties or gatherings.
These serving suggestions not only enhance the flavor of your crispy gluten-free pizzelles but also allow for creativity in presentation. Whether you’re hosting a gathering or enjoying a quiet evening at home, these ideas will make your pizzelles shine!
Tips for Perfecting Your Crispy Gluten-Free Pizzelle Recipe
Creating the perfect crispy gluten-free pizzelles is an art that can be mastered with a few helpful tips. Whether you’re a seasoned baker or a beginner, these suggestions will help you achieve delightful results every time.
- Choose the Right Flour: Not all gluten-free flours are created equal. Opt for a high-quality gluten-free all-purpose flour blend that contains xanthan gum. This ingredient helps mimic the elasticity of gluten, giving your pizzelles a better texture.
- Measure Accurately: Baking is a science, so precise measurements are crucial. Use a kitchen scale for the best accuracy, especially when measuring flour. Too much flour can lead to dense pizzelles.
- Beat Eggs Well: When beating the eggs and sugar, ensure they become light and fluffy. This step incorporates air into the batter, resulting in a lighter texture. Don’t rush this process; take your time!
- Let the Batter Rest: Allowing the batter to rest for about 10-15 minutes can improve the texture. This gives the flour time to absorb moisture, leading to a better final product.
- Preheat Properly: Make sure your pizzelle maker is fully preheated before adding the batter. A hot surface is key to achieving that crispy exterior. If using a waffle iron, check the temperature settings to ensure even cooking.
- Don’t Overcrowd the Maker: When adding batter, use only about 1 tablespoon per pizzelle. Overcrowding can lead to uneven cooking and sticking. Give each pizzelle enough space to expand.
- Cool on a Wire Rack: After cooking, place your pizzelles on a wire rack to cool. This prevents steam from building up, which can make them soggy. Cooling them properly helps maintain their crispiness.
- Experiment with Flavors: Don’t hesitate to try different extracts and spices. Adding a pinch of cinnamon or swapping vanilla for almond extract can create exciting new flavors. Get creative!
- Store Correctly: If you have leftovers, store them in an airtight container at room temperature. For longer storage, consider freezing them. Just remember to re-crisp them in a toaster oven before serving.
By following these tips, you’ll be well on your way to perfecting your crispy gluten-free pizzelle recipe. Enjoy the process, and most importantly, have fun baking!
Breakdown of Time for the Crispy Gluten-Free Pizzelle Recipe
Prep Time
Preparing your crispy gluten-free pizzelle recipe is a breeze! The prep time typically takes about 15-20 minutes. This includes gathering your ingredients, measuring them out, and mixing the batter. If you take your time to ensure everything is ready, you’ll set yourself up for success. Remember, a well-prepared kitchen makes for a smoother cooking experience!
Cooking Time
The cooking time for each batch of pizzelles is relatively quick. Once your pizzelle maker is preheated, each pizzelle takes about 30-60 seconds to cook. Depending on how many pizzelles you can fit in your maker at once, the total cooking time can range from 10-15 minutes for a full batch. Just keep an eye on them to ensure they reach that perfect golden brown color!
Total Time
In total, you can expect to spend around 30-40 minutes from start to finish. This includes both prep and cooking time. With this quick turnaround, you can enjoy fresh, crispy gluten-free pizzelles in no time! Whether you’re making them for a special occasion or just a cozy night in, this recipe is sure to delight.
Nutritional Information for the Crispy Gluten-Free Pizzelle Recipe
Calories
Each crispy gluten-free pizzelle contains approximately 90 calories. This makes them a light treat that can be enjoyed without too much guilt. Whether you’re indulging in one or two, these pizzelles fit nicely into a balanced diet. They are perfect for satisfying your sweet tooth while keeping your calorie intake in check.
Protein
In terms of protein, each pizzelle offers about 1 gram. While this may not seem like a lot, it contributes to your overall daily intake. Pairing pizzelles with a protein-rich topping, like yogurt or cheese, can enhance their nutritional value. This way, you can enjoy a delicious treat while also getting some protein in your diet!
Sodium
The sodium content in each pizzelle is around 50 milligrams. This is relatively low, making them a heart-healthy option for those watching their sodium intake. Keeping sodium levels in check is important for maintaining good health, and these pizzelles fit the bill. Enjoy them as part of a balanced diet without worrying about excess sodium!
FAQs about the Crispy Gluten-Free Pizzelle Recipe
Can I make pizzelles without a pizzelle maker?
Yes, you can! If you don’t have a pizzelle maker, a waffle iron can be a great alternative. Just keep in mind that the texture may differ slightly. The pizzelles might not be as thin and crispy, but they will still be delicious. Make sure to adjust the cooking time as needed, and enjoy your homemade treats!
How do I store leftover pizzelles?
To store leftover pizzelles, place them in an airtight container at room temperature. This will help keep them crispy for a few days. If you notice they are getting soft, you can pop them in a toaster oven for a few minutes to restore their crunch. Enjoy them as a snack or dessert whenever you like!
Can I freeze the pizzelles?
Absolutely! Freezing pizzelles is a great way to keep them fresh for longer. Just make sure they are completely cooled before placing them in a freezer-safe bag or container. They can be stored in the freezer for up to three months. When you’re ready to enjoy them, simply thaw them at room temperature or reheat them in a toaster oven for a few minutes to regain their crispiness.
What can I use instead of gluten-free flour?
If you don’t have gluten-free flour on hand, you can try using almond flour or coconut flour. However, these flours behave differently than all-purpose gluten-free flour. You may need to adjust the liquid in your recipe or add a binding agent like xanthan gum. Experimenting with different flours can lead to unique flavors and textures, so have fun with it!
Conclusion on the Crispy Gluten-Free Pizzelle Recipe
In conclusion, the crispy gluten-free pizzelle recipe is a delightful way to enjoy a traditional Italian treat without the gluten. With its simple ingredients and easy preparation steps, this recipe is perfect for both seasoned bakers and beginners alike. The versatility of pizzelles allows you to experiment with various flavors and serving options, making them suitable for any occasion.
Whether you choose to savor them with a cup of coffee, top them with fresh fruit, or indulge in a chocolate drizzle, these pizzelles are sure to impress. Plus, with the ability to customize flavors and textures, you can create a unique twist that suits your taste preferences. Remember to follow the tips for perfecting your pizzelles, and don’t hesitate to get creative in the kitchen!
So, gather your ingredients, fire up your pizzelle maker, and enjoy the process of making these crispy gluten-free delights. Share them with friends and family, or keep them all to yourself—either way, you’re in for a treat! Happy baking!
Crispy Gluten-Free Pizzelle
Ingredients
Equipment
Method
- Gather all your ingredients to ensure a smooth preparation process.
- In a medium bowl, whisk together the gluten-free flour, baking powder, and salt. In a separate large bowl, beat the eggs and sugar until light and fluffy, about 3-5 seconds. Gradually add the melted butter, vanilla, and anise extract. Mix until combined, then add the dry ingredients and stir gently until just combined.
- Preheat your pizzelle maker according to the manufacturer’s instructions.
- Lightly grease the pizzelle maker and drop about 1 tablespoon of batter onto each mold. Close the lid and cook for about 30-60 seconds until golden brown. Remove and cool on a wire rack.
- Once cooled, dust with powdered sugar if desired and store in an airtight container.