Introduction to Snowball Cookies Recipe
What Are Snowball Cookies?
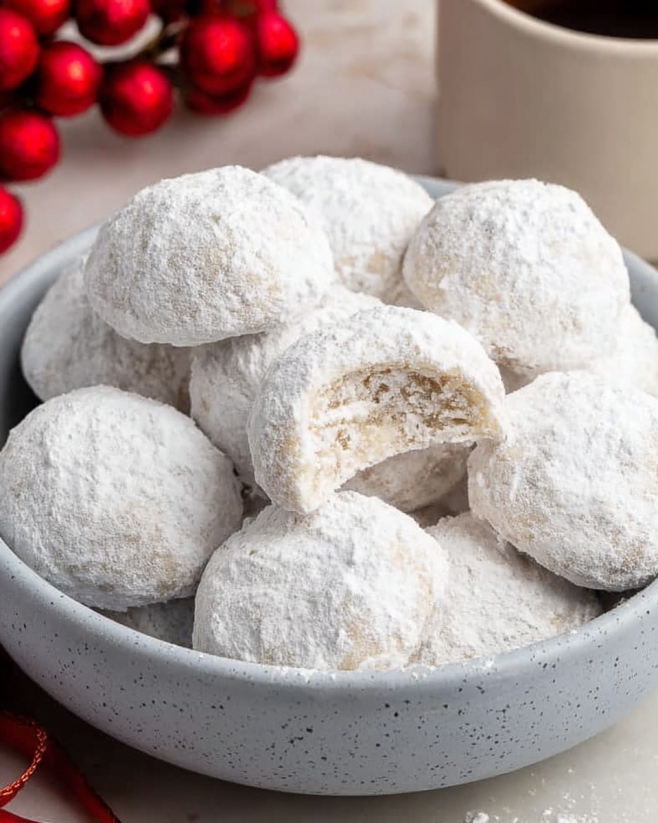
Snowball cookies are delightful little treats that melt in your mouth. They are round, buttery cookies rolled in powdered sugar, giving them a snowy appearance. Often made with nuts, these cookies are perfect for holiday gatherings or cozy family get-togethers. Their soft texture and sweet flavor make them a favorite among cookie lovers of all ages. Plus, they are easy to make, which is a bonus for busy bakers!
The History Behind Snowball Cookies
The origins of snowball cookies can be traced back to various cultures. They are known by different names, such as Russian tea cakes or Mexican wedding cookies. Each culture has its own twist on the recipe, but the core ingredients remain similar. Traditionally, these cookies were made to celebrate special occasions, often served at weddings or festive gatherings. Over time, they have become a beloved staple in many households, especially during the holiday season. Their charming appearance and delightful taste continue to bring joy to families around the world.
Ingredients for Snowball Cookies Recipe
To create the perfect snowball cookies, you’ll need a few simple ingredients. Each component plays a vital role in achieving that melt-in-your-mouth texture and delightful flavor. Here’s what you’ll need:
- 1 cup unsalted butter – Make sure it’s softened for easy mixing.
- 1/2 cup powdered sugar – This adds sweetness and helps create the cookie’s signature texture.
- 1 teaspoon vanilla extract – For a lovely, aromatic flavor.
- 2 cups gluten-free all-purpose flour – This keeps the cookies light and fluffy while catering to gluten-free diets.
- 1/4 teaspoon salt – A pinch of salt enhances the sweetness of the cookies.
- 1 cup chopped nuts – Walnuts or pecans work best, adding a delightful crunch.
- Additional powdered sugar – For dusting the cookies after baking, giving them that snowy look.
These ingredients come together to create a delicious treat that everyone will love. Whether you’re baking for a holiday party or just a cozy night in, this snowball cookies recipe is sure to impress!
Step-by-Step Preparation of Snowball Cookies Recipe
Step 1: Preheat the Oven
First things first, you need to preheat your oven to 350°F (175°C). This step is crucial because it ensures that your cookies bake evenly. While the oven heats up, you can prepare your baking sheet. Line it with parchment paper to prevent the cookies from sticking. This simple step makes cleanup a breeze!
Step 2: Prepare the Dough
Now, grab a large mixing bowl. Start by creaming together the softened butter and powdered sugar. Use a hand mixer or a whisk to mix until the mixture is light and fluffy. This process usually takes about 2-3 minutes. Next, add in the vanilla extract and mix until well combined. Gradually add the gluten-free flour and salt, mixing until just combined. Be careful not to overmix, as this can make the cookies tough. Finally, fold in the chopped nuts, ensuring they are evenly distributed throughout the dough.
Step 3: Shape the Cookies
Once your dough is ready, it’s time to shape the cookies! Scoop tablespoon-sized portions of dough and roll them into balls. Make sure they are about 1 inch in diameter. Place the dough balls on the prepared baking sheet, spacing them about 2 inches apart. This spacing allows the cookies to spread without touching each other while baking.
Step 4: Bake the Cookies
Now, it’s time to bake! Place the baking sheet in the preheated oven and bake for 12-15 minutes. Keep an eye on them; you want the bottoms to be lightly golden. The tops may not change much in color, so don’t be alarmed if they look a bit pale. Once they are done, remove the baking sheet from the oven and let the cookies cool for about 5 minutes.
Step 5: Coat with Powdered Sugar
After the cookies have cooled slightly, it’s time for the final touch! Transfer them to a wire rack to cool completely. Once they are cool, dust them generously with additional powdered sugar. This step not only adds sweetness but also gives the cookies their signature snowy appearance. Now, your snowball cookies are ready to be enjoyed!
Variations of Snowball Cookies Recipe
Nut-Free Snowball Cookies
If you or someone you know has a nut allergy, don’t worry! You can still enjoy delicious snowball cookies. Simply omit the nuts from the recipe. To add a bit of texture, consider using seeds like sunflower or pumpkin seeds. These seeds will give your cookies a delightful crunch without the nutty flavor. You can also add a bit of shredded coconut for extra sweetness and chewiness. Your nut-free snowball cookies will still be a hit at any gathering!
Chocolate-Dipped Snowball Cookies
For chocolate lovers, this variation is a must-try! After baking and cooling your snowball cookies, melt some chocolate chips in a microwave or double boiler. Dip the bottom half of each cookie into the melted chocolate, then place them on parchment paper to set. Once the chocolate hardens, you can dust the tops with powdered sugar for that classic snowy look. These chocolate-dipped snowball cookies are sure to impress and satisfy any sweet tooth!
Gluten-Free Snowball Cookies
Good news for those following a gluten-free diet! The original snowball cookies recipe is already gluten-free when using gluten-free all-purpose flour. Just make sure to check the labels on your flour and other ingredients to ensure they are certified gluten-free. You can also experiment with different gluten-free flours, like almond or coconut flour, for a unique flavor. These gluten-free snowball cookies will be just as delicious and enjoyable as the traditional version!
Cooking Note for Snowball Cookies Recipe
When making snowball cookies, it’s essential to keep a few cooking notes in mind. First, ensure your butter is at room temperature. This helps in achieving that light and fluffy texture. If your butter is too cold, it won’t cream well with the sugar. Also, be cautious with the baking time. Every oven is different, so check your cookies a minute or two early. You want them to be lightly golden on the bottom but still soft on top. Lastly, let the cookies cool completely before dusting them with powdered sugar. This prevents the sugar from melting into the cookies, keeping that snowy appearance intact!
Serving Suggestions for Snowball Cookies Recipe
Snowball cookies are perfect for any occasion! They make a delightful addition to holiday cookie trays or dessert buffets. You can serve them alongside a warm cup of tea or coffee for a cozy afternoon treat. For a festive touch, arrange them on a decorative platter and sprinkle some extra powdered sugar on top. You can also package them in cute boxes or bags as gifts for friends and family. No matter how you serve them, these cookies are sure to bring smiles and joy to everyone who tries them!
Tips for Perfecting Your Snowball Cookies Recipe
To ensure your snowball cookies turn out perfectly every time, consider these helpful tips:
- Use quality ingredients: Fresh butter and high-quality vanilla extract can make a big difference in flavor.
- Don’t skip the chilling: If your dough feels too soft, chill it in the refrigerator for about 30 minutes. This helps the cookies hold their shape while baking.
- Experiment with flavors: Try adding a pinch of cinnamon or nutmeg for a warm spice flavor. You can also use almond extract instead of vanilla for a different twist.
- Store properly: Keep your cookies in an airtight container to maintain their freshness. They can last up to a week at room temperature.
With these tips, you’ll be well on your way to baking the best snowball cookies ever!
Breakdown of Time for Snowball Cookies Recipe
Prep Time
Preparing the dough for snowball cookies takes about 15-20 minutes. This includes mixing the ingredients and shaping the cookies.
Cooking Time
The baking time is approximately 12-15 minutes. Keep an eye on them to ensure they don’t overbake.
Total Time
In total, you can expect to spend around 30-40 minutes from start to finish. This makes snowball cookies a quick and easy treat to whip up!
Nutritional Information for Snowball Cookies Recipe
Calories
Each snowball cookie contains about 120 calories. This makes them a sweet treat that can fit into most diets when enjoyed in moderation.
Protein
With 1 gram of protein per cookie, they provide a small boost, especially when paired with a glass of milk.
Sodium
The sodium content is relatively low, making these cookies a guilt-free indulgence. Each cookie contains about 50 mg of sodium, which is quite reasonable.
FAQs About Snowball Cookies Recipe
Can I freeze Snowball Cookies?
Yes! Snowball cookies freeze well. Just place them in an airtight container, and they can last up to three months in the freezer. When you’re ready to enjoy them, simply thaw at room temperature.
How long do Snowball Cookies last?
When stored in an airtight container, snowball cookies can last up to a week at room temperature. They may last longer in the fridge, but they are best enjoyed fresh!
What can I use instead of nuts in Snowball Cookies?
If you need a nut-free option, you can use seeds like sunflower or pumpkin seeds. Dried fruits like cranberries or raisins can also add a nice touch!
Are Snowball Cookies the same as Russian Tea Cakes?
Yes, snowball cookies and Russian tea cakes are essentially the same. They share similar ingredients and preparation methods, but the names vary by culture.
Conclusion on Snowball Cookies Recipe
In conclusion, snowball cookies are a delightful treat that everyone can enjoy. Their simple ingredients and easy preparation make them a favorite for bakers of all skill levels. Whether you stick to the classic recipe or try one of the fun variations, these cookies are sure to bring joy to your table. So gather your ingredients, follow the steps, and enjoy the sweet, snowy goodness of snowball cookies!
Cooking Note for Snowball Cookies Recipe
When making snowball cookies, a few cooking notes can help you achieve the best results. First, ensure your butter is softened to room temperature. This is key for creating that light and fluffy texture. If your butter is too cold, it won’t mix well with the sugar, leading to dense cookies.
Next, pay attention to the mixing process. Cream the butter and powdered sugar until the mixture is light and airy. This step is crucial for the cookies to have that melt-in-your-mouth quality. Also, when adding the gluten-free flour, mix just until combined. Overmixing can lead to tough cookies, which is not what you want!
Another important tip is to keep an eye on the baking time. Every oven is different, so check your cookies a minute or two early. You want them to be lightly golden on the bottom while remaining soft on top. If you leave them in too long, they may become dry.
Lastly, let the cookies cool completely before dusting them with powdered sugar. If you sprinkle the sugar on while they are still warm, it may melt into the cookies, ruining that snowy appearance. Following these notes will help you create perfect snowball cookies every time!
Serving Suggestions for Snowball Cookies Recipe
Snowball cookies are not just delicious; they are also versatile and can be served in many delightful ways. Here are some creative serving suggestions to make your snowball cookies shine:
- Holiday Cookie Platters: Arrange your snowball cookies on a festive platter alongside other holiday treats. Add some colorful sprinkles or edible glitter for a cheerful touch.
- With Beverages: Pair these cookies with a warm cup of tea, coffee, or hot chocolate. The rich flavors of the drinks complement the buttery sweetness of the cookies perfectly.
- Gift Giving: Package your snowball cookies in decorative boxes or bags. Tie them with a ribbon for a charming gift. They make wonderful presents for friends, family, or neighbors during the holiday season.
- At Parties: Serve snowball cookies at birthday parties, baby showers, or any gathering. Their unique appearance and delightful taste will surely impress your guests.
- As a Dessert: For a special dessert, serve snowball cookies with a scoop of vanilla ice cream. The warm cookies and cold ice cream create a delightful contrast that everyone will love.
With these serving suggestions, your snowball cookies will be the star of any occasion. Whether you’re celebrating a holiday or just enjoying a cozy night in, these cookies are sure to bring smiles and joy to everyone who tries them!
Tips for Perfecting Your Snowball Cookies Recipe
To ensure your snowball cookies turn out perfectly every time, consider these helpful tips:
- Use Quality Ingredients: Fresh butter and high-quality vanilla extract can make a big difference in flavor. Opt for unsalted butter to control the saltiness of your cookies.
- Don’t Skip the Chilling: If your dough feels too soft, chill it in the refrigerator for about 30 minutes. This helps the cookies hold their shape while baking, preventing them from spreading too much.
- Experiment with Flavors: Try adding a pinch of cinnamon or nutmeg for a warm spice flavor. You can also use almond extract instead of vanilla for a different twist that adds depth to the cookies.
- Check Your Oven Temperature: Ovens can vary in temperature. Use an oven thermometer to ensure your oven is at the correct temperature. This helps achieve the perfect bake.
- Store Properly: Keep your cookies in an airtight container to maintain their freshness. They can last up to a week at room temperature. For longer storage, consider freezing them.
- Dust with Sugar at the Right Time: Let the cookies cool completely before dusting them with powdered sugar. If you sprinkle the sugar on while they are still warm, it may melt into the cookies, ruining that snowy appearance.
- Use a Cookie Scoop: For uniform cookies, use a cookie scoop to portion out the dough. This ensures even baking and a consistent size, making your cookies look professional.
With these tips, you’ll be well on your way to baking the best snowball cookies ever! Each batch will be a delightful treat that everyone will love.
Breakdown of Time for Snowball Cookies Recipe
Prep Time
Preparing the dough for snowball cookies takes about 15-20 minutes. This includes gathering your ingredients, mixing them together, and shaping the cookies into balls. It’s a quick process that allows you to enjoy the fun of baking without spending too much time in the kitchen.
Cooking Time
The baking time is approximately 12-15 minutes. Keep a close watch on your cookies as they bake. You want them to be lightly golden on the bottom while remaining soft on top. This ensures that they have that perfect melt-in-your-mouth texture that snowball cookies are known for.
Total Time
In total, you can expect to spend around 30-40 minutes from start to finish. This makes snowball cookies a quick and easy treat to whip up! Whether you’re baking for a special occasion or just for fun, you’ll have delicious cookies ready in no time.
Nutritional Information for Snowball Cookies Recipe
Calories
Each snowball cookie contains about 120 calories. This makes them a sweet treat that can fit into most diets when enjoyed in moderation. If you’re watching your calorie intake, consider enjoying just one or two cookies at a time. They are rich and satisfying, so a little goes a long way!
Protein
With 1 gram of protein per cookie, they provide a small boost, especially when paired with a glass of milk. While they are not a significant source of protein, the nuts in the recipe do contribute to this nutritional value. If you want to increase the protein content, consider adding more nuts or serving them with a protein-rich beverage.
Sodium
The sodium content is relatively low, making these cookies a guilt-free indulgence. Each cookie contains about 50 mg of sodium, which is quite reasonable. This allows you to enjoy your sweet treat without worrying too much about your sodium intake. Just remember to balance your diet with other nutritious foods throughout the day!
FAQs About Snowball Cookies Recipe
Can I freeze Snowball Cookies?
Absolutely! Snowball cookies freeze wonderfully. To freeze them, place the cookies in an airtight container or a resealable plastic bag. They can last up to three months in the freezer. When you’re ready to enjoy them, simply take them out and let them thaw at room temperature. This way, you can have a delicious treat ready whenever you want!
How long do Snowball Cookies last?
When stored properly, snowball cookies can last up to a week at room temperature. Keep them in an airtight container to maintain their freshness. If you want them to last longer, you can store them in the refrigerator, where they may stay fresh for up to two weeks. However, they are best enjoyed fresh, so try to eat them within the first few days for the best taste!
What can I use instead of nuts in Snowball Cookies?
If you need a nut-free option, there are plenty of alternatives! You can use seeds like sunflower or pumpkin seeds for a similar crunch. Dried fruits, such as cranberries or raisins, can also add a delightful sweetness and texture. If you want to keep the cookies nut-free and still enjoy a bit of crunch, consider adding some shredded coconut or even chocolate chips for a fun twist!
Are Snowball Cookies the same as Russian Tea Cakes?
Yes, snowball cookies and Russian tea cakes are essentially the same! They share similar ingredients and preparation methods, but the names vary by culture. Both types of cookies are known for their buttery flavor and snowy appearance from the powdered sugar coating. No matter what you call them, they are a delicious treat that everyone loves!
Conclusion on Snowball Cookies Recipe
In conclusion, snowball cookies are a delightful treat that everyone can enjoy. Their simple ingredients and easy preparation make them a favorite for bakers of all skill levels. Whether you stick to the classic recipe or try one of the fun variations, these cookies are sure to bring joy to your table. The combination of buttery goodness and a snowy powdered sugar coating creates a unique experience that is hard to resist.
These cookies are not just for the holiday season; they can be enjoyed year-round. Their versatility allows you to customize them to suit any occasion. From festive gatherings to cozy family nights, snowball cookies are the perfect addition. Plus, with the option to make them nut-free or gluten-free, everyone can partake in the deliciousness!
So gather your ingredients, follow the steps, and enjoy the sweet, snowy goodness of snowball cookies! Remember, baking is not just about the end result; it’s also about the joy of creating something special. Share these cookies with friends and family, and watch as they bring smiles and warmth to your gatherings. Happy baking!
Snowball Cookies
Ingredients
Equipment
Method
- Preheat your oven to 350°F (175°C) and line a baking sheet with parchment paper.
- In a large mixing bowl, cream together the softened butter and powdered sugar until light and fluffy, about 2-3 minutes. Add the vanilla extract and mix well.
- Gradually add the gluten-free flour and salt, mixing until just combined. Fold in the chopped nuts.
- Scoop tablespoon-sized portions of dough and roll them into balls, about 1 inch in diameter. Place them on the prepared baking sheet, spacing them about 2 inches apart.
- Bake for 12-15 minutes until the bottoms are lightly golden. Let them cool for about 5 minutes before transferring to a wire rack.
- Once cooled, dust the cookies generously with additional powdered sugar.