Introduction to Chocolate Hazelnut Witch Hat Cookies Recipe
Welcome to the delightful world of baking! Today, we’re diving into a fun and festive treat: the Chocolate Hazelnut Witch Hat Cookies. These cookies are not just a delicious dessert; they also bring a touch of whimsy to any gathering. Perfect for Halloween or any celebration, these cookies are sure to impress both kids and adults alike.
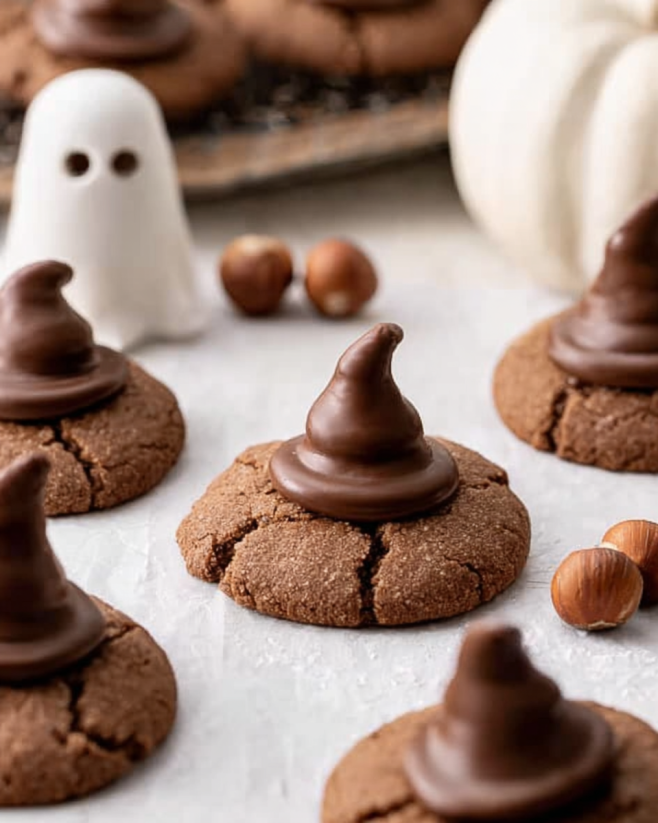
Imagine biting into a soft, chocolatey cookie that’s filled with creamy chocolate hazelnut spread. The sweet marshmallow on top adds a delightful twist, making each bite a little piece of heaven. Plus, they’re easy to make, so you can whip them up in no time!
Whether you’re hosting a spooky party or just want to enjoy a sweet treat at home, this recipe is a must-try. With simple ingredients and straightforward steps, you’ll be able to create these charming cookies without any fuss. So, roll up your sleeves and let’s get started on this magical baking adventure!
Ingredients for Chocolate Hazelnut Witch Hat Cookies Recipe
To create your own batch of Chocolate Hazelnut Witch Hat Cookies, you’ll need a few simple ingredients. Each component plays a vital role in achieving that perfect balance of flavor and texture. Here’s what you’ll need:
- 1 cup gluten-free all-purpose flour
- 1/2 teaspoon baking powder
- 1/4 teaspoon salt
- 1/2 cup unsweetened cocoa powder
- 1/2 cup granulated sugar
- 1/2 cup packed brown sugar
- 1/2 cup unsalted butter, softened
- 1 large egg
- 1 teaspoon vanilla extract
- 1 cup chocolate hazelnut spread (like Nutella)
- 1 cup chocolate chips (for decoration)
- 1 cup mini marshmallows (for decoration)
These ingredients come together to create a rich, chocolatey cookie that’s both soft and chewy. The chocolate hazelnut spread adds a creamy center, while the mini marshmallows and chocolate chips provide a delightful finish. If you’re looking to add a festive touch, consider using colored sprinkles on top of the marshmallows!
Now that you have your ingredients ready, let’s move on to the preparation steps. You’ll be amazed at how quickly these cookies come together!
Preparation of Chocolate Hazelnut Witch Hat Cookies Recipe
Now that you have gathered all your ingredients, it’s time to dive into the preparation of your Chocolate Hazelnut Witch Hat Cookies. Follow these simple steps to create a batch of cookies that will delight everyone!
Step 1: Preheat the Oven
First things first, preheat your oven to 350°F (175°C). This step is crucial as it ensures that your cookies bake evenly. While the oven heats up, you can focus on preparing the cookie dough. It’s a great way to save time and keep things moving smoothly!
Step 2: Prepare the Cookie Dough
In a medium bowl, whisk together the gluten-free flour, baking powder, salt, and cocoa powder. This mixture will provide the base for your cookies. In a separate large bowl, cream together the softened butter, granulated sugar, and brown sugar until the mixture is light and fluffy. This process usually takes about 2-3 minutes.
Next, add the egg and vanilla extract to the butter mixture. Mix until everything is well combined. Gradually add the dry ingredients to the wet ingredients, stirring until just combined. Be careful not to overmix, as this can affect the texture of your cookies.
Step 3: Shape the Cookies
Once your dough is ready, it’s time to shape the cookies! Scoop out tablespoon-sized portions of dough and roll them into balls. Place them on the prepared baking sheet, making sure to space them about 2 inches apart. This spacing allows the cookies to spread while baking without sticking together.
Now, use your thumb to create a small indentation in the center of each ball. This is where the magic happens! You’ll fill this indentation with the delicious chocolate hazelnut spread.
Step 4: Bake the Cookies
It’s time to bake! Place the baking sheet in the preheated oven and bake for 10-12 minutes. Keep an eye on them; you want the edges to be set while the centers remain soft. Once they’re done, remove the cookies from the oven and let them cool for a few minutes on the baking sheet. This cooling time helps them firm up a bit.
Step 5: Assemble the Witch Hats
While the cookies are still warm, it’s time to assemble your witch hats! Press a chocolate chip into the center of the hazelnut spread on each cookie. Then, place a mini marshmallow on top of the chocolate chip. This creates the perfect witch hat look! For an extra festive touch, consider adding colored sprinkles on top of the marshmallows before the cookies cool completely.
Once assembled, allow the cookies to cool completely on a wire rack. This will help the chocolate hazelnut spread set a bit, making them easier to handle. And there you have it! Your Chocolate Hazelnut Witch Hat Cookies are almost ready to be enjoyed!
Variation of Chocolate Hazelnut Witch Hat Cookies Recipe
While the classic Chocolate Hazelnut Witch Hat Cookies are a delightful treat, there are many ways to switch things up! Whether you want to try alternative ingredients or explore different shapes and themes, these variations can add a unique twist to your baking experience. Let’s dive into some fun ideas!
Alternative Ingredients
Sometimes, you might not have all the ingredients on hand, or you may want to cater to specific dietary needs. Here are some alternative ingredients you can use:
- Nut Butter Swap: If you’re not a fan of chocolate hazelnut spread, feel free to substitute it with peanut butter or almond butter. This will give your cookies a different flavor while still being delicious!
- Flour Options: If you don’t need the cookies to be gluten-free, you can use regular all-purpose flour instead of gluten-free flour. This will yield a slightly different texture but will still taste amazing.
- Sweetener Choices: For a healthier option, consider using coconut sugar or maple syrup instead of granulated and brown sugar. Just remember to adjust the liquid content if you use syrup.
- Chocolate Variations: You can also experiment with different types of chocolate chips, such as white chocolate or dark chocolate, to create a unique flavor profile.
These alternatives can help you customize your cookies to suit your taste or dietary preferences. Don’t hesitate to get creative!
Different Shapes and Themes
Why stop at witch hats? You can easily adapt this recipe to fit various themes and occasions. Here are some fun ideas:
- Halloween Ghosts: Instead of shaping the cookies into hats, roll them into balls and use white chocolate chips for eyes. You can also drizzle melted white chocolate over the cookies to create a ghostly effect.
- Christmas Trees: Shape the cookies into triangles and decorate them with green icing and colorful sprinkles to resemble Christmas trees. You can even use mini chocolate stars for the tree tops!
- Birthday Party Treats: Use colorful frosting and sprinkles to turn these cookies into festive birthday treats. You can shape them into circles and add a candle on top of each cookie.
- Seasonal Themes: For any holiday, simply change the decorations! Use seasonal colors and shapes to match the occasion, like hearts for Valentine’s Day or leaves for Thanksgiving.
With these variations, you can make your Chocolate Hazelnut Witch Hat Cookies fit any celebration or personal preference. So, let your imagination run wild and enjoy the process of creating these delightful treats!
Cooking Note for Chocolate Hazelnut Witch Hat Cookies Recipe
When it comes to baking, a few helpful tips can make all the difference. Here are some essential cooking notes to ensure your Chocolate Hazelnut Witch Hat Cookies turn out perfectly every time!
First, always measure your ingredients accurately. Using a kitchen scale can help you get precise measurements, especially for flour and sugar. Too much flour can lead to dry cookies, while too little can make them too gooey.
Next, make sure your butter is softened but not melted. Softened butter should be at room temperature, allowing it to cream well with the sugars. This step is crucial for achieving that light and fluffy texture in your cookies.
Additionally, don’t skip the cooling time after baking. Allowing the cookies to cool on the baking sheet for a few minutes helps them firm up. If you try to move them too soon, they may break apart.
For the best flavor, consider using high-quality chocolate hazelnut spread. The richer the spread, the more delicious your cookies will be. If you’re feeling adventurous, try adding a pinch of sea salt on top of the marshmallows for a sweet and salty combination!
Lastly, remember that every oven is different. Keep an eye on your cookies as they bake. If your oven runs hot, you may need to reduce the baking time slightly. Trust your instincts and adjust as needed for the best results.
By following these cooking notes, you’ll be well on your way to creating scrumptious Chocolate Hazelnut Witch Hat Cookies that everyone will love. Happy baking!
Serving Suggestions for Chocolate Hazelnut Witch Hat Cookies Recipe
Now that your Chocolate Hazelnut Witch Hat Cookies are ready, it’s time to think about how to serve them! Presentation can elevate your treats and make them even more enjoyable. Here are some delightful serving suggestions to consider:
- Cookie Platter: Arrange your cookies on a festive platter. You can mix them with other treats like brownies or cupcakes for a colorful dessert table. This is perfect for parties or gatherings!
- Individual Treat Bags: For a fun party favor, place each cookie in a small treat bag. Tie it with a colorful ribbon or string. This makes for a sweet gift that guests can take home.
- Hot Chocolate Pairing: Serve your cookies alongside a warm cup of hot chocolate. The rich flavors of the cookies complement the drink perfectly, making for a cozy treat on chilly days.
- Ice Cream Sandwiches: For a fun twist, use two cookies to create an ice cream sandwich. Choose your favorite ice cream flavor and let it melt slightly between the cookies for a delicious dessert.
- Decorative Display: Use a cake stand to display your cookies. You can add some Halloween-themed decorations, like mini pumpkins or spooky figurines, to enhance the festive atmosphere.
These serving suggestions not only make your cookies look appealing but also enhance the overall experience for your guests. Whether it’s a casual family gathering or a festive celebration, these ideas will surely impress everyone!
Tips for Perfect Chocolate Hazelnut Witch Hat Cookies Recipe
Creating the perfect Chocolate Hazelnut Witch Hat Cookies is all about attention to detail. With a few handy tips, you can ensure that your cookies turn out delicious every time. Here are some essential tips to keep in mind:
- Use Room Temperature Ingredients: Make sure your butter and egg are at room temperature. This helps them mix better, resulting in a smoother dough. Cold ingredients can lead to uneven mixing and affect the texture of your cookies.
- Don’t Overmix the Dough: When combining the wet and dry ingredients, mix until just combined. Overmixing can lead to tough cookies. A gentle hand will keep them soft and chewy!
- Chill the Dough (Optional): If you have time, consider chilling the dough for about 30 minutes before baking. This can help the cookies maintain their shape and prevent excessive spreading.
- Check for Doneness: Keep an eye on your cookies as they bake. They should look set around the edges but still soft in the center. Remember, they will continue to cook slightly after being removed from the oven.
- Experiment with Toppings: While chocolate chips and mini marshmallows are delightful, don’t hesitate to get creative! Try adding crushed nuts, sprinkles, or even a drizzle of caramel for an extra special touch.
- Store Properly: To keep your cookies fresh, store them in an airtight container at room temperature. They can last for up to a week, but they’re usually gone much sooner!
- Share the Love: Baking is more fun when shared! Consider making a double batch and sharing with friends, family, or neighbors. Everyone loves a homemade treat!
By following these tips, you’ll be well on your way to baking the most scrumptious Chocolate Hazelnut Witch Hat Cookies. Enjoy the process and happy baking!
Breakdown of Time for Chocolate Hazelnut Witch Hat Cookies Recipe
Understanding the time needed for each step in the baking process can help you plan better. Here’s a quick breakdown of the time required to make your Chocolate Hazelnut Witch Hat Cookies. This will ensure you have everything ready and can enjoy the baking experience without any rush!
Prep Time
The prep time for these delightful cookies is approximately 15-20 minutes. This includes gathering your ingredients, measuring them out, and mixing the dough. It’s a good idea to have everything ready before you start baking. This way, you can focus on creating those delicious cookies without any interruptions!
Cooking Time
Once your dough is ready, the cooking time is about 10-12 minutes. Keep an eye on the cookies as they bake. You want the edges to be set while the centers remain soft. This short baking time is what makes these cookies so quick and easy to prepare!
Total Time
In total, you can expect to spend around 30-35 minutes from start to finish. This includes both prep and cooking time. Once the cookies are baked, don’t forget to allow them to cool for a few minutes before assembling the witch hats. With this quick timeline, you’ll have a batch of tasty cookies ready in no time!
Nutritional Information for Chocolate Hazelnut Witch Hat Cookies Recipe
Understanding the nutritional content of your treats can help you enjoy them even more! Here’s a breakdown of the key nutritional information for the Chocolate Hazelnut Witch Hat Cookies. This will give you a better idea of what you’re indulging in while enjoying these delightful cookies.
Calories
Each Chocolate Hazelnut Witch Hat Cookie contains approximately 210 calories. This makes them a satisfying treat without being overly indulgent. Enjoying one or two cookies can fit nicely into a balanced diet, especially when shared with friends and family!
Protein
These cookies provide about 3 grams of protein per cookie. While they are not a significant source of protein, they do offer a little boost thanks to the egg and chocolate hazelnut spread. Pairing them with a glass of milk can enhance the protein content of your snack!
Sodium
Each cookie contains around 100 milligrams of sodium. This is a moderate amount, making these cookies a reasonable choice for a sweet treat. However, if you are watching your sodium intake, it’s always good to enjoy them in moderation.
Overall, the Chocolate Hazelnut Witch Hat Cookies are a delightful treat that can be enjoyed as part of a balanced diet. With their rich flavors and fun presentation, they are sure to be a hit at any gathering!
FAQs about Chocolate Hazelnut Witch Hat Cookies Recipe
Can I use a different nut butter instead of hazelnut?
Absolutely! If you prefer a different flavor, you can easily swap out the chocolate hazelnut spread for peanut butter or almond butter. Each option will give your cookies a unique taste while still being delicious. Just keep in mind that the texture may vary slightly, but they will still be delightful!
How can I store leftover cookies?
To keep your Chocolate Hazelnut Witch Hat Cookies fresh, store them in an airtight container at room temperature. This will help maintain their soft and chewy texture. They can last for up to a week, but they’re usually gone much sooner! If you want to keep them longer, consider freezing them. Just make sure to separate layers with parchment paper to prevent sticking.
Can I make these cookies gluten-free?
Yes! This recipe is already gluten-free, as it uses gluten-free all-purpose flour. Just ensure that all your other ingredients, like the chocolate hazelnut spread and baking powder, are also gluten-free. This way, everyone can enjoy these tasty cookies without worry!
What is the best way to decorate the cookies?
The best way to decorate your Chocolate Hazelnut Witch Hat Cookies is to keep it simple yet festive. After baking, press a chocolate chip into the center of the hazelnut spread and top it with a mini marshmallow. For an extra touch, you can add colored sprinkles on top of the marshmallows. This not only enhances the visual appeal but also adds a fun crunch!
Conclusion on Chocolate Hazelnut Witch Hat Cookies Recipe
In conclusion, the Chocolate Hazelnut Witch Hat Cookies are a delightful treat that combines fun, flavor, and creativity. Whether you’re baking for a special occasion or just to satisfy your sweet tooth, this recipe is sure to bring joy to your kitchen. The combination of rich chocolate, creamy hazelnut spread, and fluffy marshmallows creates a magical experience in every bite.
As you’ve seen, the recipe is straightforward and adaptable. You can easily customize it to fit your taste preferences or dietary needs. From swapping out ingredients to changing the shapes and themes, the possibilities are endless! This flexibility makes it a perfect choice for any celebration, be it Halloween, birthdays, or just a cozy family gathering.
Remember, baking is not just about the end result; it’s also about the joy of creating something special. So, gather your loved ones, roll up your sleeves, and enjoy the process of making these charming cookies together. The smiles and laughter shared while baking will be just as sweet as the cookies themselves!
We hope you give this Chocolate Hazelnut Witch Hat Cookies Recipe a try. With its delightful flavors and whimsical presentation, it’s bound to become a favorite in your home. Happy baking, and may your cookies always turn out perfectly delicious!
Chocolate Hazelnut Witch Hat Cookies
Ingredients
Equipment
Method
- Preheat your oven to 350°F (175°C).
- In a medium bowl, whisk together the gluten-free flour, baking powder, salt, and cocoa powder.
- In a separate large bowl, cream together the softened butter, granulated sugar, and brown sugar until light and fluffy, about 2-3 minutes.
- Add the egg and vanilla extract to the butter mixture and mix until well combined.
- Gradually add the dry ingredients to the wet ingredients, stirring until just combined.
- Scoop out tablespoon-sized portions of dough and roll them into balls. Place them on the prepared baking sheet, spaced about 2 inches apart.
- Create a small indentation in the center of each ball and fill it with chocolate hazelnut spread.
- Bake for 10-12 minutes until edges are set and centers remain soft. Let cool for a few minutes on the baking sheet.
- Press a chocolate chip into the center of the hazelnut spread on each cookie, then place a mini marshmallow on top.
- Allow cookies to cool completely on a wire rack.