Introduction to Bloody Halloween Cakesicles
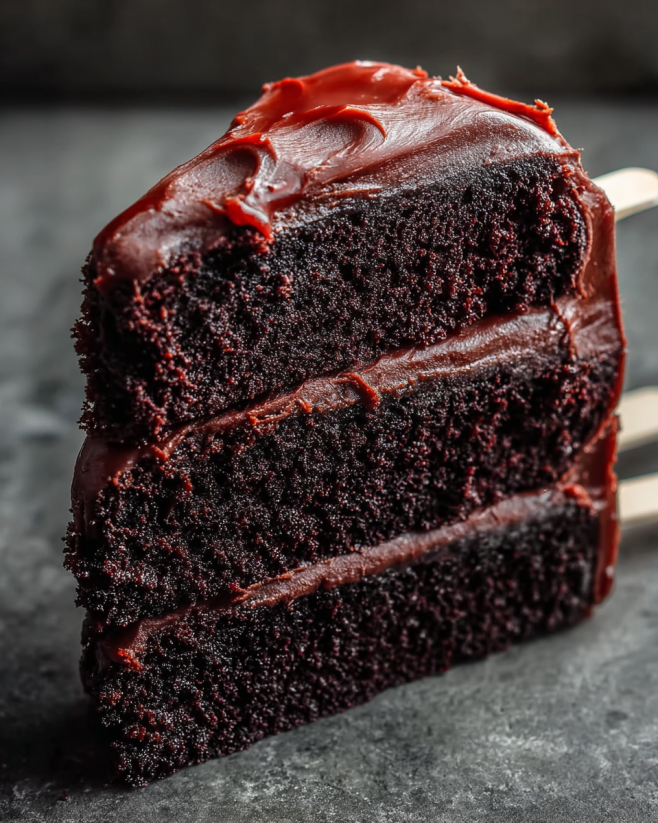
Bloody Halloween Cakesicles! These delightful desserts combine the joy of cake pops with a chilling twist that’s perfect for your Halloween festivities. Imagine biting into a moist, flavorful cake, only to be greeted by a rich, creamy coating that looks like it’s straight out of a horror movie.
These cakesicles are not only visually striking but also incredibly easy to make. With just a few simple ingredients, you can create a dessert that will impress your guests and add a festive touch to your Halloween party. The combination of vanilla and cocoa flavors makes for a delightful treat that everyone will love. Plus, the fun of decorating them with red and white candy melts adds an interactive element to your baking experience.
Whether you’re hosting a Halloween gathering, attending a costume party, or simply looking to indulge in some spooky sweets, Bloody Halloween Cakesicles are the perfect choice. They’re fun, festive, and sure to be a hit with both kids and adults alike. So, roll up your sleeves and get ready to create these ghoulishly good treats that will have everyone talking!
Ingredients for Bloody Halloween Cakesicles
Bloody Halloween Cakesicles, you’ll need a mix of simple ingredients that come together to create a deliciously eerie treat. Here’s what you’ll need:
- 1 ½ cups vanilla cake mix
- ½ cup unsweetened cocoa powder
- 1 cup water
- 1/3 cup vegetable oil
- 3 large eggs
- 1 teaspoon vanilla extract
- 1 cup butter, softened
- 4 cups powdered sugar
- 3 tablespoons milk
- 1 teaspoon red food coloring
- 1 teaspoon black food coloring
- 12 popsicle sticks
- Candy melts (red and white) for coating
- Sprinkles (optional, for decoration)
These ingredients are easy to find at your local grocery store. The combination of vanilla and cocoa powder gives the cakesicles a rich flavor, while the candy melts provide that spooky, blood-like appearance. Feel free to get creative with the sprinkles for an extra festive touch!
Now that you have your ingredients ready, let’s move on to the preparation steps to bring these ghoulish treats to life!
Preparation of Bloody Halloween Cakesicles
Bloody Halloween Cakesicles! Follow these simple steps to create your spooky treats that will wow your guests.
Step 1: Gather Your Ingredients and Tools
Before you start, make sure you have everything you need. Gather your ingredients, mixing bowls, a whisk, a baking pan, and a baking sheet lined with parchment paper. Having all your tools at hand will make the process smoother and more enjoyable.
Step 2: Bake the Cake
Preheat your oven to 350°F (175°C). Grease and flour a 9×13 inch baking pan. In a large bowl, mix the vanilla cake mix, cocoa powder, water, vegetable oil, eggs, and vanilla extract. Stir until the batter is smooth and well combined. Pour the batter into the prepared pan and bake for 25-30 minutes. To check if it’s done, insert a toothpick in the center. If it comes out clean, your cake is ready! Let it cool completely before moving on.
Step 3: Crumble the Cake
Once your cake has cooled, it’s time to crumble it. Take the cooled cake and break it into small pieces in a large bowl. This step is crucial as it helps create the perfect texture for your cakesicles. Make sure there are no large chunks left; you want a fine crumble for the best results.
Step 4: Mix with Frosting
Now, add the softened butter to the crumbled cake. Mix it well until the cake and butter are fully combined. This mixture should be moist enough to hold its shape when formed. If you want a sweeter touch, you can also add a bit of frosting at this stage. Just remember, the more frosting you add, the sweeter your cakesicles will be!
Step 5: Shape the Cakesicles
With your cake mixture ready, it’s time to shape the cakesicles. Take a small amount of the mixture and form it into an oval shape around each popsicle stick. Make sure the stick is securely attached. Place the shaped cakesicles on a baking sheet lined with parchment paper. This will help prevent sticking and make it easier to dip them later.
Step 6: Prepare the Coating
While your cakesicles are firming up in the freezer, it’s time to prepare the candy coating. Melt the red and white candy melts separately according to the package instructions. Make sure to stir them well until they are smooth and free of lumps. This will ensure a nice, even coating on your cakesicles.
Step 7: Dip and Decorate
Once the cakesicles have been in the freezer for at least an hour, it’s time to dip them! Take each cakesicle and dip it into the melted candy coating, allowing any excess to drip off. For a spooky effect, drizzle the contrasting color over the top while the coating is still wet. You can also add sprinkles for an extra festive touch. Let the coating set completely before serving your deliciously eerie treats!
Variation of Bloody Halloween Cakesicles
Bloody Halloween Cakesicles are a hit, you can easily switch things up to suit your taste or theme. Here are some fun variations to consider that will keep your Halloween treats exciting and delicious!
Alternative Flavors for Cakesicles
Why stick to just one flavor when you can explore a variety? Here are some alternative flavors you can try:
- Chocolate Cake: Swap the vanilla cake mix for chocolate cake mix. This will give your cakesicles a rich, decadent flavor that chocolate lovers will adore.
- Red Velvet: Use red velvet cake mix for a festive twist. The vibrant color will add to the spooky theme, especially when paired with cream cheese frosting.
- Cookies and Cream: Add crushed cookies to your cake mixture for a cookies and cream flavor. This adds a delightful crunch and a unique taste that everyone will enjoy.
- Pumpkin Spice: For a seasonal touch, use pumpkin spice cake mix. This flavor is perfect for fall and will give your cakesicles a warm, cozy taste.
Feel free to mix and match flavors to create your own signature cakesicles. The possibilities are endless!
Different Coating Options
The candy coating is what makes these cakesicles visually striking. However, you can experiment with different coatings to enhance the flavor and appearance:
- Dark Chocolate: Instead of candy melts, use melted dark chocolate for a rich and slightly bitter flavor that pairs well with sweet cake.
- White Chocolate: For a sweeter option, use melted white chocolate. You can also tint it with food coloring to match your Halloween theme.
- Colored Candy Melts: Get creative with different colors of candy melts. You can use green for a witchy vibe or orange for a classic Halloween look.
- Sprinkles and Edible Glitter: Add a fun touch by rolling your cakesicles in sprinkles or edible glitter after dipping them in the coating. This will make them sparkle and shine!
Bloody Halloween Cakesicles that will delight your guests and keep the Halloween spirit alive!
Cooking Note for Bloody Halloween Cakesicles
Bloody Halloween Cakesicles, there are a few important cooking notes to keep in mind. These tips will help ensure that your cakesicles turn out perfectly every time, making your Halloween celebration even more enjoyable.
First, always measure your ingredients accurately. Baking is a science, and even a small deviation can affect the texture and flavor of your cakesicles. Use measuring cups and spoons for precision.
Next, make sure your butter is softened but not melted. Softened butter blends better with the cake crumbs, creating a moist and cohesive mixture. If your butter is too hard, it won’t mix well, and if it’s too melted, it can make the mixture too runny.
When crumbling the cake, ensure there are no large chunks left. A fine crumble is essential for shaping the cakesicles. If you find it difficult to crumble, you can use a food processor for a quicker and more uniform texture.
Freezing the cakesicles is a crucial step. This helps them hold their shape when you dip them in the melted candy coating. If they are not frozen long enough, they may fall apart during dipping. Aim for at least one hour in the freezer.
While melting the candy melts, do so in short intervals in the microwave. Stir in between to prevent overheating. Overheated candy melts can become thick and unusable. If this happens, you can add a small amount of vegetable oil to thin it out.
Bloody Halloween Cakesicles and ensure they are easy to handle.
By following these cooking notes, you’ll create cakesicles that are not only delicious but also visually stunning. Enjoy the process and have fun creating these spooky treats!
Serving Suggestions for Bloody Halloween Cakesicles
Bloody Halloween Cakesicles are ready, it’s time to think about how to serve them. Presentation can elevate your spooky treats and make them even more appealing to your guests. Here are some fun and creative serving suggestions to consider:
- Spooky Dessert Table: Create a themed dessert table for your Halloween party. Arrange the cakesicles on a black or orange tablecloth, and use decorative platters or stands to display them. Add some fake spider webs, plastic spiders, or mini pumpkins for an extra spooky touch.
- Individual Treat Bags: For a fun party favor, place each cakesicle in a clear treat bag tied with a festive ribbon. This makes it easy for guests to grab a treat as they mingle. You can even add a little tag that says “Bloody Halloween Cakesicles” for a personal touch.
- On a Stick: Since cakesicles are already on popsicle sticks, consider serving them upright in a container filled with rice or beans. This not only looks cute but also makes it easy for guests to pick one up without any mess.
- Pair with Drinks: Serve your cakesicles alongside themed drinks. Consider spooky punch, apple cider, or even a Halloween-themed cocktail. The combination of sweet treats and festive drinks will create a delightful experience for your guests.
- Garnish with Edible Decorations: Enhance the visual appeal by garnishing your cakesicles with edible decorations. Use edible glitter, candy eyes, or even small chocolate bats to make them look even more festive and fun.
Bloody Halloween Cakesicles look fantastic but also create a memorable experience for your guests. Whether you’re hosting a big party or a small gathering, these ideas will help you showcase your delicious creations in style!
Tips for Perfecting Your Bloody Halloween Cakesicles
Bloody Halloween Cakesicles can be a fun and rewarding experience. To ensure your spooky treats turn out just right, here are some helpful tips to keep in mind. These suggestions will help you achieve the best flavor, texture, and appearance for your cakesicles.
First, always use fresh ingredients. Check the expiration dates on your cake mix, eggs, and other perishables. Fresh ingredients will enhance the flavor and texture of your cakesicles, making them more enjoyable for everyone.
Next, consider the temperature of your ingredients. For the best results, let your eggs and butter sit at room temperature before mixing. This helps them blend more easily into the batter, resulting in a smoother texture.
When mixing your cake batter, avoid overmixing. Stir just until the ingredients are combined. Overmixing can lead to dense cakes, which may not hold up well when crumbled and shaped into cakesicles.
For shaping your cakesicles, use wet hands. Dipping your hands in water can prevent the cake mixture from sticking to your fingers. This makes it easier to form smooth, even shapes around the popsicle sticks.
While freezing the cakesicles, ensure they are spaced apart on the baking sheet. This prevents them from sticking together and allows for even freezing. If they are too close, they may lose their shape when you try to dip them.
When it comes to dipping, work quickly but carefully. The candy melts can start to harden if they sit too long. If you find the coating thickening, you can reheat it gently in the microwave for a few seconds to restore its smooth consistency.
For a professional touch, use a piping bag to drizzle the contrasting color over the dipped cakesicles. This allows for more control and creates a more polished look. You can also experiment with different drizzle patterns for added flair.
Lastly, let your cakesicles set in the refrigerator instead of at room temperature. This helps the coating harden more quickly and keeps the cakesicles from becoming too soft. Once set, they’ll be easier to handle and serve.
Bloody Halloween Cakesicles that will impress your guests. Enjoy the process, and don’t forget to have fun while baking!
Breakdown of Time for Bloody Halloween Cakesicles
Bloody Halloween Cakesicles, it’s essential to have a clear understanding of the time involved. This will help you organize your baking session and ensure everything runs smoothly. Here’s a breakdown of the time you’ll need for each step of the process.
Prep Time
Bloody Halloween Cakesicles is approximately 20-30 minutes. This includes gathering all your ingredients and tools, mixing the cake batter, and preparing the baking pan. Make sure to have everything ready before you start baking. This will make the process much easier and more enjoyable!
Cooking Time
Once your cake batter is ready, it’s time to bake! The cooking time for the cake is about 25-30 minutes. After baking, allow the cake to cool completely, which can take an additional 30-60 minutes. This cooling period is crucial, as it prevents the cake from becoming too warm when crumbled.
Total Time
Bloody Halloween Cakesicles. This includes prep time, cooking time, and the time needed for the cakesicles to freeze before dipping. If you plan to decorate them, factor in an extra 15-20 minutes for that step as well. Overall, it’s a fun and engaging process that will yield delicious results!
By understanding the time commitment, you can better plan your Halloween baking adventure. Enjoy the process, and get ready to impress your friends and family with these spooky treats!
Nutritional Information for Bloody Halloween Cakesicles
Bloody Halloween Cakesicles, it’s always good to know what you’re consuming. Understanding the nutritional information can help you enjoy these spooky delights while keeping your dietary goals in mind. Here’s a breakdown of the key nutritional components for each cakesicle:
Calories
Bloody Halloween Cakesicle contains approximately 250 calories. This makes them a fun treat to enjoy during your Halloween festivities without going overboard. Remember, moderation is key, especially when enjoying sweet treats!
Protein
In terms of protein, each cakesicle provides about 3 grams. While this isn’t a high protein snack, it does contribute to your daily intake. Pairing these cakesicles with a protein-rich drink or snack can help balance your treat with some extra nutrition.
Sodium
Each cakesicle contains around 150 mg of sodium. This is a moderate amount, so if you’re watching your sodium intake, it’s good to keep this in mind. Enjoying these cakesicles as part of a balanced diet can help you manage your overall sodium consumption.
Bloody Halloween Cakesicles are a delightful treat that can fit into your Halloween celebrations. With their fun appearance and tasty flavors, they’re sure to be a hit at any gathering. Just remember to enjoy them in moderation, and you’ll have a spooktacular time!
FAQs about Bloody Halloween Cakesicles
What are cakesicles?
Bloody Halloween Cakesicles take this concept further by adding a spooky theme, perfect for Halloween celebrations. They are not only delicious but also visually striking, making them a hit at parties!
How can I make Bloody Halloween Cakesicles less sweet?
Bloody Halloween Cakesicles. First, you can reduce the amount of powdered sugar in the frosting mixture. Additionally, consider using a less sweet cake mix, such as a chocolate cake mix without added sugar. You can also skip the sprinkles or use unsweetened cocoa powder for decoration. Lastly, using dark chocolate for the coating instead of candy melts can provide a richer flavor with less sweetness.
Can I use store-bought cake for Bloody Halloween Cakesicles?
Bloody Halloween Cakesicles. You can crumble the store-bought cake and mix it with frosting or butter as you would with homemade cake. This makes the process quicker while still allowing you to enjoy the fun of decorating and shaping your cakesicles!
How long do Bloody Halloween Cakesicles last?
Bloody Halloween Cakesicles can last for about 3-5 days in the refrigerator. To keep them fresh, place them in an airtight container. If you want to store them for a longer period, you can freeze them. Just make sure to wrap each cakesicle individually in plastic wrap and place them in a freezer-safe container. They can last up to 2 months in the freezer. When you’re ready to enjoy them, simply thaw them in the refrigerator before serving!
Conclusion on Bloody Halloween Cakesicles
Bloody Halloween Cakesicles are a delightful and spooky treat that can elevate any Halloween celebration. With their fun appearance and delicious flavors, they are sure to impress both kids and adults alike. The combination of moist cake, creamy coating, and festive decorations makes these cakesicles a perfect addition to your Halloween festivities.
Not only are they easy to make, but they also offer endless possibilities for customization. Whether you choose to stick with the classic flavors or experiment with unique variations, the fun lies in the creativity of decorating and presenting these treats. Plus, with the tips and variations provided, you can tailor them to suit your taste and theme.
Bloody Halloween Cakesicles, remember to enjoy the process. Baking is not just about the end result; it’s about the joy of creating something special. So gather your ingredients, invite some friends or family to join in, and have a blast making these spooky delights!
Bloody Halloween Cakesicles!